When Sugar and Crumbs got in touch with me and told me about their flavoured icing sugars, I was intrigued and when I heard they did a coconut and lime flavour it was a done deal! I had to try it out for myself! so they sent me some to try and I decided to give it a whirl and turn it into some cheesecake in a jar!
Initially I had planned to use a few drops of coconut extract in the cheesecake mix as I usually would, but the beauty of these flavoured icing sugars is I didn't need to add any! The sugar was so flavourful that it would have been an overkill adding extract to my surprise! and oh the smell as you opened up the pouch to add it into the mixer - it was totally tropical and delicious! and the great thing is the flavours are all natural. It tasted just as good as it smelt too!
I layered the cheesecake in between some coconut cupcakes, and combined with a graham cracker crust this was one tasty dessert to go!
I even tied a little spoon on and gave them away as gifts, the perfect little no bake treat!
Using a whisk, whip the double cream until stiff peaks form.
Beat the cream cheese and icing sugar together with a paddle attachment in a freestanding electric mixer.
Stir the cream into the cream cheese mix with a spoon until incorporated. Stir in the desiccated coconut and refrigerate for 30 minutes.
Melt the butter in a microwave safe bowl for 30 seconds.
Blitz the graham crackers into crumbs using a food processor. Add in the melted butter.
Spoon two and a half tablespoons of biscuit mix into the bottom of each jar. Smooth it out on top with the back of a teaspoon.
Cut coconut cupcakes into cubes. I used 1.5 cupcakes per jar.
Put the cheesecake mix into a piping bag with a star nozzle fitted.
Pipe a layer of cheesecake on top of each biscuit base. Layer with cubes of coconut cupcake. Repeat with a piped layer of cheesecake, and one more layer of coconut cupcake. Finish off with a small swirl of coconut cheesecake and a sprinkling of shredded coconut.
Eat and enjoy.
I received the icing sugar complimentary from Sugar and Crumbs, but all views and opinions expressed are my own.
While I went to the kitchen to stuff my face with coconut m&m's, I told my husband to export my photos for me that I was going to blog about. He told me that he knows how to do a blog post, so I told him to go for it and just write the whole thing, when I returned he told me the post was finished! It was so great that I had to leave it as it is! There's nothing more I can add!
Aside from the fact that I dreamt these Blondies up in one of those lightbulb moments, where I was deciding how I could bake my beloved white chocolate & coconut Lindt bar into something yummy. Coconut & lime is one of my favourite flavour pairings so it seemed only natural that I should combine the two with my coconut Lindt chocolate!
I know the blogosphere is awash with peppermint, egg nog and gingerbread recipes right now...but in my world you can and should eat coconut and lime every day of the week regardless of the season, especially when it's paired with white chocolate frosting and topped with grated lime zest and shredded coconut - delish!
Lime and Coconut Blondies:
Makes 12
From Cupcake Crazy Gem
225g White Coconut Lindt Chocolate
1/2 cup unsalted butter
1 cup caster sugar
3 large eggs
1/2 cup plain flour
1/4 cup desiccated coconut
2 tbsp lime juice
1 heaped tbsp lime zest
Preheat oven to 180 degrees C/350 degrees F.
Melt White Coconut Lindt Chocolate along with the butter in a heatproof bowl, set above a pan of simmering water.
Remove from heat once completely melted, and allow to cool. Beat in caster sugar and eggs with a whisk.
Stir flour and coconut into the batter. Add lime juice and grated lime zest.
Pour into prepared brownie pan (I made mine in a square pan) and bake for 20-25 minutes, or until an inserted knife comes out with just a few moist crumbs attached.
Leave to cool in pan whilst making this creamy white chocolate frosting:
1/2 cup unsalted butter
1 cup icing sugar
1/4 cup melted white chocolate chips
Melt white chocolate chips in a bowl in the microwave in 30 second intervals.
Beat unsalted butter and sifted icing sugar together.
Once cooled, stir in the melted chocolate. Continue beating for 3-5 minutes until the frosting is fluffy.
Spread generously on top of the Blondies, sprinkle with grated lime zest and handfuls of shredded coconut.
So we all know of my love for coconut - it's widely documented on here! I love how it pairs so fantastically with so many flavours but out of all the combos you get lime and coconut has to be my all time fave! I was, of course, trying to think of ways to use up the rest of my Key Lime juice and I had remembered seeing a few recipes for lime curd recently that had piqued my interest so the idea of Key Lime curd was born!
and to accompany it I whipped up a lime and coconut flavoured cake too!
I'm not the biggest fan of lemon curd, it's okay but I would never go out of my way to buy it. So there I was thinking curd wasn't really for me. Until I made my first batch of Key Lime curd which is out of this world amazing...I haven't looked back since, I'm already planning raspberry curd, passion fruit curd and you guessed it coconut curd! The sky is the limit! Seriously...you need this Key Lime curd in your life! It is SO good! and oh man, it made this cake my all time favourite layer cake. The curd between each layer of cake helped to keep it super moist and it just paired with the creamy coconut frosting so beautifully!
I can seriously see lots more of these cakes in my future because it was just so deliciously tasty that I've been craving it ever since I finished off the last slice a few weeks back! I urge all of you, who are after a light and refreshingly tasty cake to give this one a whirl - you won't regret it!
and yes - for all those of you super observant bloggers out there, I did purposely co-ordinate my green polka dot ribbon with my lime green bake! My obsessiveness is not limited to coconut, but extends to colour co-ordination too!
8 tbsp unsalted butter, cut into tablespoon sized pieces
Coconut & Lime Cream Cheese Frosting:
1/2 cup unsalted butter, softened
1/4 cup cream of coconut
85g cream cheese, softened
1 tsp freshly grated lime zest
5 cups icing sugar
4-5 tbsp double cream
Make the Key Lime curd one day before you make the cake. Add all ingredients, except butter, to a saucepan over low heat. Whisk to combine. Add butter. Continue whisking gently but constantly, heating slowly, until curd thickens and reaches 160°F on a sugar thermometer. Remove from heat. For the smoothest curd, pour through a fine mesh strainer (I didn't do this because I wanted larger bits of zest in mine). Transfer to a bowl, cover and refrigerate over night. (It will keep for up to 1 week in the fridge).
Preheat oven to 180 degrees C. Grease 2 round 9 inch cake pans; set aside.
Combine the flour, baking powder and bicarbonate of soda in a medium bowl and set aside.
Beat butter and sugar in a freestanding electric mixer on medium speed until well mixed. Add the cream of coconut and lime zest; continue beating, scraping bowl often, until smooth. Add 1 egg at a time, beating well after each addition. Reduce speed to low; add flour mixture alternately with coconut yoghurt. Beat until well mixed.
Divide batter evenly between prepared pans. Bake for 35-40 minutes or until a toothpick inserted in the centre comes out clean and cake is a deep golden brown. Cool in pans for 10 minutes. Remove from pans and cool on wire racks.
For the frosting: beat butter, cream of coconut, cream cheese and lime zest in the bowl of a freestanding electric mixer. Beat at medium speed until creamy. Reduce speed to low; add icing sugar, one cup at a time. Add enough cream until it is at spreadable consistency.
To assemble:
Cut off the domes on top of each cake so that they are flat.
Using a cake slicer, slice each cake in half so that you are left with 4 cake rounds.
Place a layer of Key Lime curd in between each layer of cake. Apply a thin crumb coat of cream cheese frosting all over the cake and place it in the fridge for about 30 minutes.
Once it is firm, take it out and cover the cake in the rest of the frosting. Using a palette knife, and turning it in opposite directions, make swirls in the frosting around the side of the cake.
Using a cake smoother, smooth out the top and cover the top in shredded coconut.
Cut a single slice of lime and twist it to adorn the top of the cake.
So off I went to my first (and sadly last since I've left Wales now) Clandestine Cake Club!
It was hosted by the very lovely Katie who had opted for a Queen's Jubilee Tea theme. Our cakes themselves didn't have to be representative of the Jubilee, they just had to be pretty, luxurious and something the Queen would enjoy eating!
Although Katie went all out with the theme and even decorated her Black Forest Cherry Cake with cardboard cutouts of some Guards, The Queen and even Prince Philip! Very royal indeed!
Christine made a classic victoria sponge covered in lashings of cream and strawberries.
Jane made a ginger cake covered in candied kumquats. This was a nice pairing, and my first time trying kumquats - they were pretty tasty!
Tracey's cake had to be my favourite of the night! because surprise suprise it involved coconut! It was a coconut cake, sandwiched with jam and buttercream and it was very delicious!
Here's a shot of our spread, complete with Jubilee serviettes and everything! A super fun night was had by all and I'm hoping to start up a Clandestine Cake Club when we move to Vancouver!
So I am blogging all out of order at the moment. I literally have a zillion bakes to blog about! but I've moved this one to the top of the list.
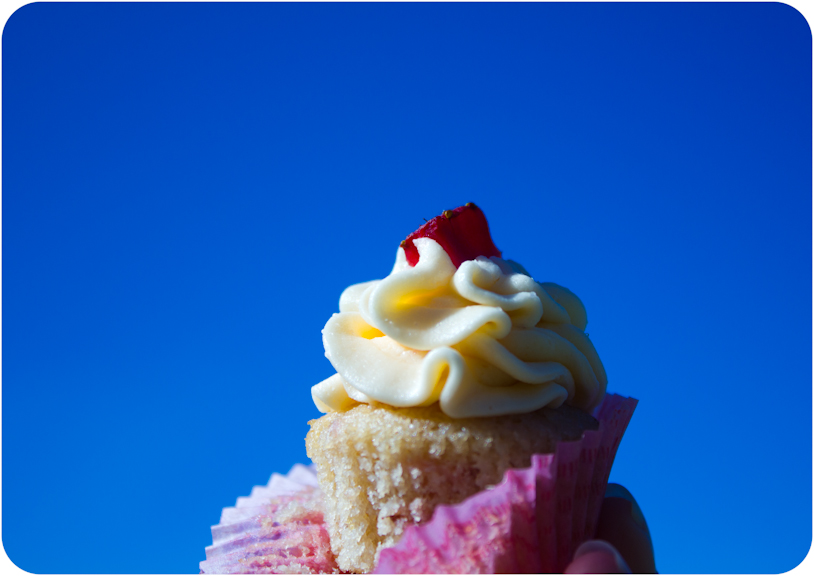
I made these cupcakes last month when we had that amazing week of sunshine and WARM weather! With the luck we have here in the UK that's probably our summer come and gone! so I hope you all enjoyed it! which is also why even though I had spent the whole previous day doing a double bake fest with some uni friends (that post will be coming shortly too) when we got invited to a Sunday BBQ with some friends of ours from church, I couldn't pass up the chance to bake again. After all, I know that our BBQ days are probably numbered!
I also had a little bowl of strawberry puree left over from the bake fest that was calling out to be used up. I decided it would only be right to whip up some strawberry cupcakes, so I was pretty pleased to find this Sprinkles recipe from Martha's website. Sprinkles Cupcakes is one of the biggest best know cupcakeries in the world! So these cupcakes should have been amazing right? Well, I've come to learn recently, first hand, that the recipes bakeries publish in recipe books/online are not actually the real recipes they use - shocker I know!
So for me these cupcakes were just okay, they did have a lovely strawberry flavour but they weren't moist enough for me.
Luckily, the frosting was the star of the show and so I wasn't too sad about the non amazing cupcakes themselves.
As I was getting ready to make some strawberry frosting I decided that strawberry cupcakes plus strawberry frosting was a little too much. I knew I needed to think of a good flavour to pair strawberry with in the frosting and that's when it came to me - LIME!
Let me tell you, I am a lime lover and a half. As in, I eat limes whole! Obviously, minus the skin...but I like nothing better than buying a bag of limes and cutting them in half and eating them with a spoon!
Why had I never thought of lime and strawberry before? Byron was skeptical when I excitedly told him my idea, he asked if it had been done before and was clearly not on board! So I googled it just to reassure him that other people had tried it and it had worked out okay for them!
So I just went with it and whipped up the strawberry frosting, then taking a small amount I added some lime juice and lime zest and after Byron tried it to confirm it was completely delicious I unleashed the lime goodness on my whole batch of frosting.
The next day right before the BBQ, I chopped up some fresh strawberry pieces to top each cupcake.
Seriously that is how crazy blue the sky was on the beautiful sunny day we ate them! So I just had to take a picture. It hasn't been that blue or sunny since - I'm waiting very patiently for both to return, but I'm not holding out much hope!
Tonight I am blogging and procrastinating an essay I should be writing, what's new! Are any of you procrastinating something you should be doing? Share it with me below and help me feel better about my own laziness and aversion to uni work!
Strawberry Cupcakes: Makes 24 mini's or 12 regular From Sprinkles Cupcakes via Martha Stewart
80g pureed strawberry (you will need a little extra for the frosting too)
187g plain flour, sifted
1 tsp baking powder
1/4 tsp salt
1 tsp vanilla extract
50ml semi-skimmed milk
1 large egg, at room temperature
2 large egg whites, at room temperature
113g unsalted butter, at room temperature
225g caster sugar
Preheat oven to 180 degrees C.
Place strawberries in a small food processor and process until pureed.
In a medium bowl, whisk together the flour, baking powder and salt. Set aside. In a small bowl, mix together the milk, vanilla extract and strawberry puree. Set aside.
In the bowl of an electric mixer fitted with the paddle attachment, cream butter on medium-high speed, until light and fluffy. Gradually add sugar and continue to beat until well combined. Reduce the mixer speed to medium and slowly add the egg and egg whites until just blended.
With the mixer on low, slowly add half the flour mixture and mix until blended. Then add half the milk mixture and repeat the process one more time.
Divide batter evenly among cupcake cases, filling them 2/3 full. Bake mini's for 12-15 minutes and regular sized cupcakes for 22-25 minutes or until tops are just dry to the touch.
Leave to cool in tins for 5 minutes and then transfer to a wire rack to cool completely before frosting.
Strawberry Lime Frosting: Makes enough to frost the above From Cupcake Crazy Gem
1 tsp lime zest
1 tbsp lime juice
1 1/2 tbsp strawberry puree
400g icing sugar
250g unsalted butter
In an electric mixer fitted with the paddle attachment, beat the butter and sifted icing sugar until well blended.
Add the puree and beat again.
Add the lime zest and lime juice. Beat until just incorporated and then taste.
I was making these for a crowd of people and I didn't know their feelings on lime so I kept it subtle, if you're really big lime lovers then add more juice/zest to suit your tastebuds.
So hopefully this post will make up for the lack of baking I've been putting on the blog recently!
First up were my moms birthday cupcakes. It was quite a funny story, I'd been planning these for quite a while. Last year on her birthday I made her Toblerone cupcakes and for Mother's Day I made her Lime & Coconut cupcakes, two of her favourite flavour combos, so I was struggling to come up with something new that she would find amazing this time around when suddenly it struck me - Key Lime Pie! Mom is a huge fan of Key Lime Pie and i just knew they would turn out great in cupcake form too so I was pretty excited to make them.
Imagine my disappointment when she called early on in the week to tell me I wasn't allowed to bring any baked goods home this weekend because she was on a 'serious diet'. So there went that plan, until in a later phone call I mentioned she was going to be missing out on some Key Lime Pie cupcakes and she promptly told me she could bend the rules for those!!
So arriving with no baked goods turned into arriving with a whole box of Key Lime Pie cupcakes, a Coconut & Banana Bundt cake, a whole box of cheesecakes and some mini Coconut Cream Pies!
Whoops...so the rules were definitely bent but all the treats were thoroughly enjoyed nonetheless!
Usually I don't like to bake with 'fairy cake' cases and prefer to only use proper cupcake size cases, however my love of colour co-ordination won in this decision so I opted for 'lime' green cases to match the Key Lime cupcakes.
I filled these with a delicious home made Key Lime filling, and the colour co-ordination fun didn't stop there...check out my 'lime' piping bag too!
They were then topped with some super glossy meringue frosting that had just a hint of Key Lime juice in to jazz it up...and then the fun began...
I have never used a blow torch before. Personally I prefer grilling my meringue topped cupcakes so that the meringue is quite crunchy but I feel the blow torch effect makes them more aesthetically pleasing! So I decided to give it a go...
This picture is to show you not everything always goes to plan! I decided to test on my 'reject' cupcake that had not been frosted so well and I'm glad I did because as you can see I set fire to it!
So next time around, I moved my blow torch a bit further back and managed not to set any more cupcake liners of fire, although the tip of the meringue just caught - it kind of looks like a candle!! but as you can see from my pic at the top of this post it all turned out okay in the end! and yes I bake in my 'I heart NY' pj's, don't you just love them!
If you want to bake up these delicious cupcakes too then here is the recipe, I adapted it slightly from here...it was the first time I had ever used icing sugar in the cupcake batter as opposed to the frosting but it helped to give it a lovely light and fluffy texture so I was a fan!
Key Lime Pie Cupcakes with Meringue Frosting
(Makes 18 fairy cake size cupcakes)
For the cupcakes:
-->
3/4 cup unsalted butter, at room temperature
1 1/2 cups icing sugar
1 tablespoon lime zest
2 large eggs
1 1/3 cup plain flour
1 3/4 teaspoon baking powder
1/2 teaspoon salt
1/3 cup natural yoghurt (this was meant to be buttermilk but I substituted with yoghurt as the corner shop at the end of the road didn't sell buttermilk!)
2 tablespoon key lime juice
-->
1. Preheat the oven to 180°C. Line cupcake tin with cupcake liners.
2. Beat the butter in the bowl of an electric mixer fitted with the paddle attachment for 1 minute. Add the icing sugar and lime zest; beat until light and fluffy.
3. Add the eggs one at a time, mixing well between each addition.
4. Mix the flour, baking powder and salt in a bowl. Add half the flour mixture to the butter and beat until well-combined.
5. Mix in the yoghurt and key lime juice, then the remaining flour. Mix until just combined.
6. Spoon the batter into the lined cupcake tins until three-quarters of the way full. Tap the tins on the counter a few times, then bake the cupcakes for 25 minutes or until a toothpick inserted in the center comes out clean. Cool the cupcakes in the tins for 5 minutes, then remove the cupcakes and cool to room temperature.
1. In a medium saucepan combine sugar, eggs, lime zest and juice.
2. Cook mixture over medium-low heat, whisking constantly. Cook until mixture begins to thicken and hold the mark of a whisk ran through it; about 10-15 minutes.
3. Remove pan from heat. Whisk in diced butter a few pieces at a time. Mix until well combined.
4. Strain mixture through a fine sieve.
5. Cover mixture tightly with plastic by laying plastic wrap directly on the surface of the curd. This prevents a film from forming. Chill for 3 hours or overnight to set the curd.
For the Meringue frosting:
-->
4 large egg whites
1 cup granulated sugar
1/2 teaspoon key lime juice
1/2 teaspoon vanilla extract
1. Fill a small pot 2-inches deep with water. Set it over medium-high heat to bring to a simmer.
2. Combine the egg whites, sugar and cream of tartar in the metal bowl of a stand mixer or a heatproof bowl. Set the bowl over the simmering water and whisk continuously until the sugar dissolves and the egg whites are warm to the touch, about 5 minutes. Be careful not to cook the egg whites.
3. Remove the bowl from the pot of water and turn off the heat. Set the bowl in the base of the stand mixer fitted with the whisk attachment, or use a hand mixer.
4. Beat the egg whites at high speed until shiny and hold stiff peaks when the whisk is lifted, about 5 minutes.
5. Add the key lime juice and vanilla extract and whisk 2 minutes longer.
6. Fit a pastry bag with a small star tip and fill with meringue. Pipe the meringue onto the cooled cupcakes.
7. Use a small kitchen torch to toast the meringue.
It was my dad's birthday a few weeks ago, I was planning to post him some baked goods but thought it would be safer to bring them by hand, which led to a very late night baking session the day before we left which is why these pictures are not the greatest! Hopefully I have heavy sleeping neighbours who don't mind a KitchenAid whirring at 1am in the morning!
Like me, my dad is a huge coconut fan and also a fan of banana bread so I combined the two using this recipe I found while in the Caribbean. Apart from this time I had the added bonus of shredded coconut which I was super excited about. I also added a coconut glaze which made it even more moist than usual, and making it in a bundt shaped tin was a fun change too. It has been the highlight of the weekend so I can definitely recommend giving it a try!
Coconut & Banana Bundt cake:
1/2 cup desiccated coconut
1/2 cup shredded coconut
1 cup caster sugar
1 1/2 cup self raising flour
1 cup mashed banana
1 cup coconut milk
1 egg
1 teaspoon of vanilla extract
1. Grease and line your tin, and preheat your oven to 170°C.
2. In a large bowl combine dry ingredients.
3. Mash your banana and combine with the rest of the wet ingredients in a separate bowl.
4. Pour wet mixture over dry mixture and mix until combined. (it will look a little lumpy due to the chunks of banana and the coconut)
5. Place batter in your prepared pan and cook for about one hour until your cake is lightly browned and a skewer inserted in the centre comes out clean.
6. Allow to cool in pan for 10 minutes and then turn out onto a wire rack to cool completely.
For the topping:
2 tablespoons unsweetened coconut milk
1/4 teaspoon vanilla extract
1 cup icing sugar
1 cup shredded coconut
1. Whisk the coconut milk, vanilla extract and 1/2 cup icing sugar in a bowl until smooth.
2. Add more sugar as needed to thicken.
3. Sprinkle shredded coconut over the top.
The coconut theme continues...and I have a feeling it will do for a while now we've finally managed to source shredded coconut here in the UK - there is no stopping me!
I adapted my recipe from this one and after a little local hunt for graham crackers failed I ended up using shop bought pie crusts...they actually weren't too shabby! and the coconut filling tastes ah-mazing! I haven't managed to replicate the amazingness of the Coconut Cream Pie I had whilst in the Caribbean but it is certainly the best I've had in the UK!
Coconut Cream Pie Mini's
(Makes 8)
Mini tart cases
1 cup whole milk
1 cup coconut milk, well-whisked
1/2 vanilla bean, split lengthwise
2 tablespoons butter, cut into 4 pieces
3/4 cup sugar
1/4 cup cornstarch
3 large egg yolks
1 large (whole) egg
40g desiccated coconut
1. Combine the first four ingredients in a 2-quart saucepan, scraping out the vanilla seeds and tossing both seeds and pod in the pan. Place over high heat and bring to a boil.
2. Meanwhile, whisk the sugar and cornstarch together in a small bowl.
3. In the now-cleaned mixing bowl, whisk the egg yolks and whole egg. Whisk in the sugar/cornstarch mixture.
When the milk/coconut milk mixture comes to a boil, add 3/4-cup of it, whisking, to the egg mixture to temper.
4. Pour the egg mixture back into the saucepan, whisking, reduce the heat to low, and make constant figure-8s with a wooden spoon or heatproof spatula for about 90 seconds, or until the mixture thickens.
5. Pass through a strainer into a large bowl and fold in the desiccated coconut.
6. Add 80g of the coconut filling to each individual tart case.
For the topping:
2 cups double cream
80g coconut milk
1/4 cup caster sugar
Shredded coconut
1. Place heavy cream and coconut milk in mixing bowl, and whip on medium speed until it begins to thicken.
2. Slowly add sugar, increase speed to high and whip until stiff.
3. Add 50g of cream topping to each individual pie.
I wanted to make some cupcakes as a Mother's Day present but I didn't just want to make any old cupcakes...they had to be extra special! Initially I was going to make some key lime pie cupcakes since my mom is a huge KLP fan! (and if you like key lime pie go check out the amazing giant key lime pie cupcake that i heart cuppycakes made-it looks delish!) but I decided on lime and coconut in the end and used a recipe for coconut cupcakes from Martha Stewart and the Primrose Bakery's lime and coconut buttercream recipe.
A few days earlier I had seen some amazing cupcake bouquets made by the very talented molly bakes, you should really check them out - they are fantastic! I decided I would try and have a go myself...so I ordered some sugarcraft roses which as a rule I would never do. I generally hate anything fondant or sugarcraft, they may add a little something but they taste bad and for me it's just buttercream all the way! This is what they looked like once decorated:
I thought for a while about how you put them in your pot, I decided I would use oasis and florists wire. That really didn't work out so well, the cupcakes were just too heavy for the poor wire! so in the end I just scrunched up lots of tissue and sat the cupcakes on top and tied it all up with cellophane. It didn't really look as good as I imagined it would in my head...but Byron assured me it looked nice and I needed to stop being a perfectionist! I would like to work out a way though that I could raise up the cupcakes so they are different heights.
Here is the finished product!
It was a hit with my mom, here she is about to open it up and devour them!
I know everyone probably thinks they have the best mom in the world, but really I do. I'm afraid I win this hands down and I challenge anyone to find a better mom! My mom is the best letter writer, she writes more letters than anyone I know! When I was at Uni there wasn't a week that went by that I didn't get a note, a letter or a parcel (and of course it goes without saying the envelopes were always beautifully adorned with stickers or polka dots!!). At one point the warden of my halls of residence even asked me if I was sending myself post because I got more than anyone ever had done before! and the mail still keeps coming to this day, I have boxes and boxes filled with all of these cards and notes that I just can't seem to throw away because they show the amount of love my mom has for me! and what's been in the packages? i hear you ask, well you can guarantee it's always been polka dot or cupcake related (my two big loves)!! I owe gratitude to my mom for pretty much all my awesome cupcake belongings!! in fact if you're wondering where I got all those fantastic cupcake wrappers from in the pic at the top of this post it was from my mom!!
So I hope everyone (who lives in the UK!) has spoilt their moms today and told them how much they mean to them..I love you Mom..even more than cupcakes!!!