So you know I'm on this mission to add Nutella and Ferrero Rocher's to every single one of my favourite bakes! and Banana Bread is one of my go to recipes so it was only a matter of time before it got a 'Roch-ella' make over!
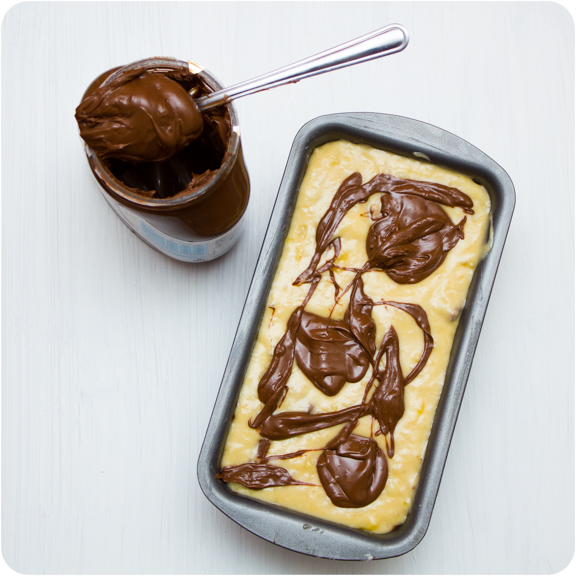
I baked this up one Friday night a few weeks back, we had some friends coming over for lunch the following day and I thought it would be a perfect afternoon snack for them. As I was chopping all these Ferrero's I thought to myself there is no other way I would want to be spending my Friday night! It was a perfect little moment of baking joy, so I snapped a pic just for you…and for me, to remember that happy little thought! Don't you just want to delve in head first?? I was particularly impressed with myself that I didn't sneak one crumb of Ferrero goodness into my mouth, I am learning self restraint painfully well while on my diet at the moment!
Actually looking back, it was a rather torturous bake to make and not indulge in, that Nutella spoon was just waiting to be licked! I guess the motivation of knowing I would be allowed a piece the following day made it all worth it! Don't you think every bake should be generously drizzled with oozy gooey Nutella right before being popped in the oven? If you're not so sure…we probably can't be friends, and you should probably stop following this blog, haha!
I did have a go at making a Nutella banana bread last year some time but I went way over board on the amount of Nutella I baked in and it left the middle of the loaf a little uncooked, so moderation is key to make this one work.
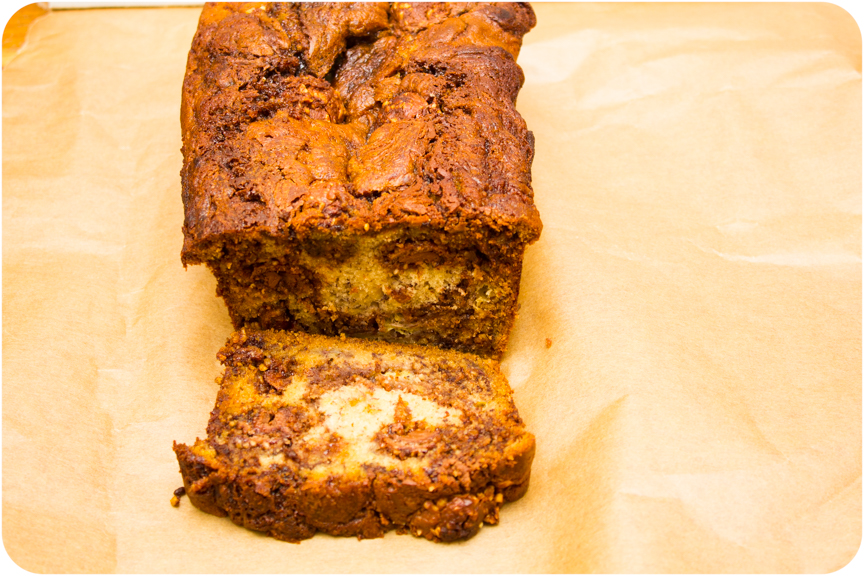
I love the swirly ribbons of Nutella you see throughout the bread...
and those Ferrero's peeking out take it over the top! Just when you thought banana bread couldn't get any better it can! This was totally delicious and the pairing of nutella and bananas is one I love, and with the addition of the Ferrero Rocher's you just can't go wrong!!
Ferrero Rocher & Nutella Banana Bread:
Serves 10
From Cupcake Crazy Gem
250g plain flour
165g caster sugar
1 tsp bicarbonate of soda
1/2 tsp salt
5 tbsp unsalted butter
2 large eggs, beaten
3 large bananas, mashed
65g banana yoghurt (use plain if you prefer)
1 tsp vanilla extract
12 ferrero rochers
160g nutella
Preheat oven to 180 degrees C. Grease a loaf tin.
In a large bowl, whisk together the flour, sugar, bicarbonate of soda and salt. Set aside.
Melt the butter in a small bowl and add it to the bowl of the mixer. Once the eggs have been beaten in a small bowl, add them to the mixer too. Mash the bananas and add them along with the yoghurt and vanilla extract to the mixer. Beat on medium speed until everything has been incorporated.
Add the dry ingredients in two batches, beating on low-medium speed until everything is combined - do not overbeat.
Chop the ferrero rochers into halves using a sharp knife. Reserve 6 half pieces of ferrero rocher back for decoration, and with a spatula stir the rest into the batter.
In a small microwaveable bowl, heat the nutella for 30 seconds until slightly soft.
Pour half the batter into the loaf tin. Spoon half of the nutella on to the top of the batter, and using a knife swirl it through the batter. Add the remaining batter and repeat with the rest of the warmed nutella on top. Add the 6 ferrero halves.
Bake for 55-60 minutes, or until a knife inserted comes out clean. There will be pockets of nutella so make sure you don't test it where the nutella is.
Leave in the loaf tin for 10 minutes, and then transfer to a wire rack to cool completely.
Eat and enjoy…and if you want to eat it like me zap each piece in the microwave before eating for 15 seconds and slather in butter. Yum!
Before I well and truly fall off the face of the planet...here's a blog post!!
Excuse my absence...I was off having a baby! and then I had decided I was going to make an amazing extravagant over the top pink themed bake to announce the baby news, but you know what, babies are hard work! and in between feeding and changing and playing and washing and cooking and repeating that cycle all through the day it has left little time for blogging...and even for baking, sadly enough!
I laugh to myself when I think back to the conversation I had with my husband whilst I was still pregnant, telling him I was going to really focus on my blog when the baby came along, as obviously I wouldn't be working and would have all the time in the world....wrong! Even when the baby is sleeping, I can't bake for fear that my Kitchenaid would wake her up again!
So I've mostly only been throwing together quick no bake desserts in the past few months, and I've also become really good at baking in the half an hour window in the evening when her daddy is bathing her!!
So I decided if I was ever going to blog again, I had to forego the extravagant bake announcing Ella's arrival and just tell you already! Ella Kristyn Braithwaite arrived on the 8th February, if you follow me on instagram at all you will be FULLY aware of the fact I had a baby because I'm pretty sure not a day goes by that I don't post a picture of her, but I can't help myself! We are also living away from all our family and friends right now so it's as much for all of them as it is for myself that I take hundreds of pictures! She is a pure joy! We could not be any happier, and despite the waking for night feeds, and the lack of time for baking/blogging we wouldn't have it any other way! If you want to read about how she came into the world, in such a relaxed and happy manner surprisingly, then you can do so here...and she has continued on in that same happy vein. She naps great in the day, has a long 7-8 hour stretch sleeping when she goes down and only wakes once for a feed, and gives you more smiles than you know what to do with! She is a really content relaxed baby and we feel super lucky that not only was my pregnancy such a breeze, that the rest has been too :)
and I just cannot believe our little lady turned 4 months old on Sunday! It has flown by in a second!!
But I digress...before I forget what I came here to tell you about...let's talk about banana bread! There can never be enough banana bread recipes...and you can never bake too much banana bread. In fact, despite my general lack of baking in recent months, in the past month I managed to bake 3 different banana breads! A chocolate chip banana bread, a rather fabulous nutella banana bread and this beauty of a coconut banana bread with passion fruit frosting!! It is quick and easy to throw together, a great way to use up brown bananas that you had big plans on eating healthily with but instead they withered away in your fruit bowl, and I consider it a semi healthy treat vs a big pan of fudgy brownies so it's win win all round!
I totally devoured the first two banana breads I baked without taking any photos of them at all, bad blogger, and I nearly did the same with this so I got out my camera and took a few lazy token shots just to give you the idea. I promise I'll put some more effort into the next bake I feature!!
All you really need to know is that you haven't tried banana bread until you've tried this one! I'm forever trying to 'coconu-tify' every bake I make, so a cup of dessicated coconut was an easy way to do so in this bake...and oh the frosting, I ate the leftover frosting by the spoonful and you'll want to as well! I found this amazing passion fruit coulis on the shelf in tesco one day and just knew I wanted to bake with it, so it's been sitting in my cupboard waiting for it's debut! All I needed to do was whip a few tablespoons of it into some vanilla frosting to produce the creamiest dreamiest passion fruit frosting. It was too easy to be true! but it was...and then a sprinkling of shredded coconut and real passion fruit seeds tied it all together nicely!
I made this as a treat for the pack lunches that I made for all the ladies at my church when we went on a nice little trip together last weekend. Within a few minutes of people trying the banana bread, they were all offering to move in with me so I think it went down pretty well :)
1 1/2 cups plain flour
1 tsp bicarbonate of soda
1/2 tsp salt
1 cup caster sugar
2 eggs, lightly beaten
3 large, ripe bananas, mashed
1/4 cup unsalted butter, melted
1/2 cup desiccated coconut
2 cups icing sugar
3/4 cup unsalted butter, at room temperature
1/4 cup passion fruit coulis
seeds of half a passion fruit
1/4 cup shredded coconut
Preheat oven to 180 degrees C. Grease your loaf tin with butter.
In a large bowl, whisk together the sifted flour, soda, salt and sugar.
Mix in the slightly beaten eggs and mashed bananas.
Slowly stir in the melted butter until just incorporated.
Stir in the desiccated coconut.
Pour into your prepared tin, and bake for 45-50 minutes, or until a knife inserted into the centre comes out clean. If the top starts to brown sooner than you would like, cover with tin foil to prevent burning. Let cool in the tin for 10 minutes and then turn out onto a wire baking rack to cool completely.
Prepare the frosting by whipping the butter in a freestanding mixer with the beater attachment. Sift in the icing sugar, stir it with a spoon before you turn on the mixer to ensure your work surfaces do not get covered in a dusting of icing sugar. Beat in the passion fruit coulis.
Spread the frosting on to the cooled loaf with a palette knife. Sprinkle the shredded coconut on top and cover with the passion fruit seeds.
A few weeks ago we had the American missionaries from our church over for dinner. As well as cooking them up some Enchiladas (since Americans always complain about the lack of Mexican in this country) I also wanted to bake them something to remind them of home.
I knew it had to involve peanut butter, and cream pies always scream America to me so I remembered a peanut butter pie recipe I had come across ages ago. When trying to find it again, I came across this version which seemed even better to me because it involved an Oreo crust AND Nutella!!
So it's pretty much all my favourite ingredients in a pie!
Everything tastes better with an Oreo crust...it's a fact! Recently, I've even been baking up magic bars using Oreo crusts since sadly I no longer have easy access to graham crackers now we're back on this side of the pond!
Next time I would probably even spread a more generous amount of Nutella on the bottom of the pie because I'm so obsessed with the stuff! The filling is the creamiest dreamiest stuff you can imagine, due to the cream cheese and the condensed milk inside it, and I like to top mine off with some straight up cream as well just to balance out all the sweetness.
It is the pie that dreams are made of! Bake one up today, you and your dinner guests will not be disappointed!
Crush the Oreos in a food processor until you have fine crumbs. Stir in the melted butter until combined and press the mixture in the bottom of your tart tin and up the sides if desired.
In a heatproof bowl, warm the Nutella in the microwave in 30 second intervals until runny. Pour it over the bottom of the cookie crust and spread it out to the edges using the back of a spoon. Place the crust in the fridge to chill.
Pour the double cream into the stand mixer bowl and whisk until stiff peaks form. Store in the fridge until ready to use. Place the cream cheese and peanut butter in the mixing bowl and beat on medium speed until light and fluffy. Reduce speed to low and gradually beat in the icing sugar. Add the condensed milk, vanilla extract and lemon juice. Increase speed to medium and beat until everything is combined and the filling is smooth. Using a large spatula, stir 1/3 of the whipped cream from the fridge into the filling mixture.
Slice the banana thinly and arrange the slices on top of the Nutella crust. Pour the peanut butter filling over the banana slices. Smooth out with a spatula. Spoon the remaining cream on top of the filling. Warm the Nutella 'til it melts in the microwave and drizzle over the top of the pie. If you want to be super neat use a piping bag, if your piping bag supply has run out like mine had just flick it using a knife (I sort of liked the rustic look of this way!) Crumble up Flake and sprinkle it over the top.
Place in the freezer for 3 hours or overnight before serving.
So I made these delicious little loaves back for Canadian Thanksgiving which was October 8th! It's taken me a while to get around to blogging about them because these pictures are not great! How I miss my collection of beautiful cake stands that are all packed away back in England in my parents attic! Instead I had to make do with a chopping board and our fall table runner from Wal Mart! Sad times!
I was planning to be totally traditional and make a pumpkin pie but it's not my husbands favourite, when I gave him the choice of pie or me revamping one of his absolute faves - choc chip banana bread, it was no contest for him!
Plus there doesn't seem to be enough banana bread variations on my blog just yet ;)
I also decided to bake mini versions because everything is more fun in mini form! The flavours worked really well together, it was super moist from the pureed pumpkin and the mashed banana, with just the right amount of spice coming through and when it was warmed up you had melting pools of chocolate too - delish!
For all my American followers out there who are currently planning their Thanksgiving menu's, why not give this a try!
In a large bowl combine brown sugar, butter and eggs. Mix until mixture is light and fluffy, approximately 1 to 2 minutes. Add pumpkin and bananas, mix well, for another 2 minutes.
Add remaining ingredients, except chocolate chips, mix until just moistened for another minute. Stir in chocolate chips with a spoon.
Pour into four greased mini loaf pans, or one regular sized loaf pan.
Bake for 40-50 minutes or until a knife inserted comes out clean.
Cool for 5 minutes and then remove from pans and transfer to a wire rack to cool completely.
Serve warm with lashings of butter! It's the best way!
Speaking of pumpkin, I also made these cute little peanut butter filled pretzel pumpkins for a Halloween party we went too. They won the prize for the best dessert of the night! but I forgot to take proper photos of them as I was in rush to get them finished and paint my nails with maple leaves for being a Canadian Hockey Fan! so you'll have to make do with this instagram pic!
If you want to make some, you can follow Erica's recipe. Instead of using chocolate chips to make my jack-o-lantern faces I just used an edible food marker.
I'm not really a blueberry person, I'm not sure why because they are delicious! but it's just not something I find myself every buying! so when I came across a tub of them in the fridge and there were some over ripe bananas on the counter, I knew what had to be done!
Banana bread is just one of those classics that you can make hundreds of times and never get bored of it! I love being able to experiment with different variations of banana bread and this blueberry one is one of the tastiest and most moist to date!
If you're a blueberry lover, and even if you're not (like my husband) you will still love this bake!
Combine the flour, baking powder, bicarbonate of soda and salt. Set aside. In the bowl of an electric mixer, beat sugar and butter together until light and fluffy, about 2 minutes. Add eggs, milk and vanilla. Mix well until combined. Beat in bananas. With the mixer at low speed, gradually add in the flour mixture until just combined. Using a spatula, fold in the blueberries.
Pour batter into the loaf pan. Bake for 45-50 minutes, until an inserted knife comes out clean.
Remove from the oven and let cool in pan for 15 minutes before transferring to a wire rack to cool completely.
Slice, and eat warm with lashings of butter!
On a funny side note, since I have moved to Vancouver I have been super into blueberries! They have blueberry flavour everything! even gummy bears, which were really tasty! and I now have fresh blueberries for breakfast most mornings with this really delicious pineapple and coconut yoghurt I found in the supermarket! So I'm sure it will only be a matter of time before I whip up another of these loaves!
My second batch of banana bread in a few weeks....it wasn't planned but a bunch of black bananas sitting in the kitchen forced my hand in this! My husband told me it was time to make banana bread, and I remembered this recipe that I had pinned to my 'to bake' list on pinterest forever ago!
and then I found myself gifted with some white choc Reese's cups from my sister for my birthday (yes you may have noticed that over half of my birthday presents consisted of American confectionary! doesn't everyone know me well!) and coupled with a bag of mini Reese's cups that I picked up in Brighton this weekend and I was ready to go!
I had also been saving this creamy Reese's peanut butter for a special occasion. I picked it up from TK Maxx a few months back and was waiting for a special bake before I used it. I might be making it up but in my head it tastes far superior to any other type of peanut butter!
I'm pretty sure that I'll never be able to just make regular banana bread ever again because this variation was SOOOO super delicious! The peanut butter gave it a great depth of flavour and those melting pools of peanut butter cups were amazing, my only complaint is that I wished there was more of them so if I made it again I'd definitely up the amount of cups I added in!
and of course we all know there's only one way to eat it...zapped in the microwave for 25 seconds and slathered in lots of butter which melts into the bread beautifully!
Be sure to give this bread a try - you'll be SO glad you did!
White & Milk Choc Reese's Peanut Butter Cup Banana Bread:
In a medium bowl, whisk together the flour, bicarbonate of soda, baking powder and salt, set aside.
In a bowl of a freestanding electric mixer, beat together the bananas, peanut butter, oil, egg and sugars.
Pour the dry ingredients into the wet ingredients and beat until just combined. The batter will be lumpy, do not over stir.
Dust the Reese's cups with some flour, and fold them into the batter with a spatula.
Spread batter into the prepared tin.
Bake for approx 1 hour or until a knife inserted in the middle comes out clean.
Let cool in pan for 10 minutes, then loosen the edges of the pan with a knife and remove from loaf pan, transferring bread to a cooling rack.
I'm entering this into Alphabakes this month being hosted by Caroline Makes as the letter is 'W'. If you want to check out all the other W entries, check her blog at the end of the month and check The More Than Occasional Baker's blog next month for the new letter if you want to join along!
Do you have a favourite chocolate bar? I'm the youngest of 4 girls in my family. When all my older sisters had already started school, my mom and I used to get up to all kinds of fun without them! One of our favourite things to do was day trip it in London, which was only a 20 minute train ride away. We would go check out all the art galleries and museums - I'm pretty sure I was the only 3 and a half year old who knew my Monet from my Manet! (I'm not sure I could say the same these days...how was I more cultured as a child than a 25 year old?!) but you know what one of my favourite parts of our day was? even before we got to London? It was our little train station ritual. We would go to the little shop on the platform and my mom would buy me a Twix (because it was my favourite!). Without fail, every time this is how it went down.
Until one time when my mom had to go to South Africa because her dad was in hospital, and my aunt came to look after us. She took me to London one day so I thought I'd bring her up to speed with the Twix tradition. She was more than happy to oblige, and it was all going so well ...up until the point when she asked me if she could have half - I was pretty horrified. This was not how it was meant to go! I told her that my mom never asked for half my Twix and I don't remember how the rest of the story goes after that point - whether I did indeed share my Twix or whether I kept it to myself!
One thing I do know is that I'm older and wiser, and hopefully less bratty now and I'm more than ready to share Twix' all round! so here I am sharing this amazing Twix Banana Bread recipe with you after I saw it over at Jocelyn's blog. The little chopped up Twix bits add a crunchy and chewy surprise to the banana bread and the chocolate melts into it too. If I could make this any better, I'd probably add some kind of caramel glaze next time. Otherwise it's a quick and easy treat to whip up for when you have over ripe bananas, one quick run to the shop to get some chocolate and you're good to go!
Next time around I would think about making a caramel glaze to drizzle on top, it was what I had planned to do when I set out to bake them but the amazing smell in my kitchen was overwhelming and we had to tuck into them while they were still warm, foregoing any glaze making!
1 cup caster sugar 1 tsp vanilla 2 eggs 1 1/2 cups plain flour 1 tsp bicarbonate of soda 1 tsp salt 1 cup mashed banana (about 3) 1/2 cup sour cream 2 cup chopped Twix bars
Beat the butter and sugar until creamy. Add the eggs and vanilla and beat again. Stir in the bicarbonate of soda and salt. Slowly add the flour to the mixture while the mixer is running. Do not over beat.
Fold in the bananas, sour cream and Twix bars by hand until incorporated. Pour into your loaf tins that have been sprayed with non stick spray or greased with butter. Bake at 180 degrees C for 1 hour and 5 minutes. Check with a sharp knife or toothpick to see if it is done...if not, bake another 5 minutes. Let cool for 10-15 minutes in the pan, then remove and cool on a wire rack.
P.S For those observant ones out there you may have noticed I said I made a big loaf and 6 mini loaves. Unfortunately the big loaf was not pretty enough to photograph because of the rubbish loaf pan I had bought! I had spotted a silicone orange loaf container in pound land and since I love colour co-ordinating so much I thought it would be fun to use a big orange pan alongside my little mini orange pans but the silicone wasn't sturdy enough and produced a very wonky looking loaf.
Moral of this story: don't purchase your bakeware in pound land! Many of you probably wouldn't even think to do that anyway, but remember I am stuck in North Wales and baking shops are thin on the ground so sometimes you have to take what you can get!
I have been on a definite cookie kick lately! In the past two weeks alone I've whipped up four different kinds...along with brownies, cupcakes, rocky roads. I never fully realised the extent of mine and my husband's sweet tooth's until these past few weeks. Every night after dinner we wonder what yummy treat we can have...and usually I wonder over to the kitchen to see what I can make happen!
So when Byron requested cookies, I asked what kind - peanut butter and banana was his response. I googled some recipes to see what I could find and I finally settled on this one.
I decided the addition of some chocolate chunks would add an extra level of deliciousness and I was right, these were some seriously fat cakey oozing with gooey chocolate cookies! They were so easy to whip up, so quick to bake that I can see they are going to be repeated often in our household!
What is great about these cookies is that (due to having a really tiny baking sheet) I only baked 4 actual cookies on the night we were after some treats. I refrigerated the rest of the dough tightly wrapped up in clingfilm and for 3 days afterwards every time we came in from Uni we popped 4 more in the oven so the warm cookie goodness kept us going all through the week!
Here's my adapted recipe:
Peanut Butter, Chocolate Chunk and Banana Cookies:
Makes 24 cookies
1/2 cup firmly packed brown sugar
1/2 cup caster sugar
3/4 cup crunchy Peanut Butter
1 stick of unsalted butter (1/2 cup) at room temperature
1 over-ripe banana
1 tablespoon vanilla
1 egg
1 3/4 cups sifted plain flour
3/4 teaspoon bicarbonate of soda
1/2 tsp salt
1 cup chopped up milk chocolate chunks
In a large mixing bowl cream the brown sugar, caster sugar and butter. Next, add peanut butter and continue to cream. Add vanilla and banana, salt and bicarbonate and the egg. Slowly add in flour to bring it all together. Stir in chopped up chocolate chunks. If making drop cookies simply spoon onto baking sheet.
To make formed cookies:
Refrigerate dough for at least 30 minutes. Preheat oven to 180 degrees C. Take a small amount of dough, about the size of ping-pong ball and shape into a ball. Place on a cookie sheet. You should be able to fit 12 on a large sheet. Bake for approximately 8 minutes. The cookies should be a light brown. Remove from oven, and allow to cool for 2-3 minutes and carefully transfer to a cooling rack.
Your cookies will be moist and delicious! If you prefer a crunchier cookie, bake a little bit longer.
So hopefully this post will make up for the lack of baking I've been putting on the blog recently!
First up were my moms birthday cupcakes. It was quite a funny story, I'd been planning these for quite a while. Last year on her birthday I made her Toblerone cupcakes and for Mother's Day I made her Lime & Coconut cupcakes, two of her favourite flavour combos, so I was struggling to come up with something new that she would find amazing this time around when suddenly it struck me - Key Lime Pie! Mom is a huge fan of Key Lime Pie and i just knew they would turn out great in cupcake form too so I was pretty excited to make them.
Imagine my disappointment when she called early on in the week to tell me I wasn't allowed to bring any baked goods home this weekend because she was on a 'serious diet'. So there went that plan, until in a later phone call I mentioned she was going to be missing out on some Key Lime Pie cupcakes and she promptly told me she could bend the rules for those!!
So arriving with no baked goods turned into arriving with a whole box of Key Lime Pie cupcakes, a Coconut & Banana Bundt cake, a whole box of cheesecakes and some mini Coconut Cream Pies!
Whoops...so the rules were definitely bent but all the treats were thoroughly enjoyed nonetheless!
Usually I don't like to bake with 'fairy cake' cases and prefer to only use proper cupcake size cases, however my love of colour co-ordination won in this decision so I opted for 'lime' green cases to match the Key Lime cupcakes.
I filled these with a delicious home made Key Lime filling, and the colour co-ordination fun didn't stop there...check out my 'lime' piping bag too!
They were then topped with some super glossy meringue frosting that had just a hint of Key Lime juice in to jazz it up...and then the fun began...
I have never used a blow torch before. Personally I prefer grilling my meringue topped cupcakes so that the meringue is quite crunchy but I feel the blow torch effect makes them more aesthetically pleasing! So I decided to give it a go...
This picture is to show you not everything always goes to plan! I decided to test on my 'reject' cupcake that had not been frosted so well and I'm glad I did because as you can see I set fire to it!
So next time around, I moved my blow torch a bit further back and managed not to set any more cupcake liners of fire, although the tip of the meringue just caught - it kind of looks like a candle!! but as you can see from my pic at the top of this post it all turned out okay in the end! and yes I bake in my 'I heart NY' pj's, don't you just love them!
If you want to bake up these delicious cupcakes too then here is the recipe, I adapted it slightly from here...it was the first time I had ever used icing sugar in the cupcake batter as opposed to the frosting but it helped to give it a lovely light and fluffy texture so I was a fan!
Key Lime Pie Cupcakes with Meringue Frosting
(Makes 18 fairy cake size cupcakes)
For the cupcakes:
-->
3/4 cup unsalted butter, at room temperature
1 1/2 cups icing sugar
1 tablespoon lime zest
2 large eggs
1 1/3 cup plain flour
1 3/4 teaspoon baking powder
1/2 teaspoon salt
1/3 cup natural yoghurt (this was meant to be buttermilk but I substituted with yoghurt as the corner shop at the end of the road didn't sell buttermilk!)
2 tablespoon key lime juice
-->
1. Preheat the oven to 180°C. Line cupcake tin with cupcake liners.
2. Beat the butter in the bowl of an electric mixer fitted with the paddle attachment for 1 minute. Add the icing sugar and lime zest; beat until light and fluffy.
3. Add the eggs one at a time, mixing well between each addition.
4. Mix the flour, baking powder and salt in a bowl. Add half the flour mixture to the butter and beat until well-combined.
5. Mix in the yoghurt and key lime juice, then the remaining flour. Mix until just combined.
6. Spoon the batter into the lined cupcake tins until three-quarters of the way full. Tap the tins on the counter a few times, then bake the cupcakes for 25 minutes or until a toothpick inserted in the center comes out clean. Cool the cupcakes in the tins for 5 minutes, then remove the cupcakes and cool to room temperature.
1. In a medium saucepan combine sugar, eggs, lime zest and juice.
2. Cook mixture over medium-low heat, whisking constantly. Cook until mixture begins to thicken and hold the mark of a whisk ran through it; about 10-15 minutes.
3. Remove pan from heat. Whisk in diced butter a few pieces at a time. Mix until well combined.
4. Strain mixture through a fine sieve.
5. Cover mixture tightly with plastic by laying plastic wrap directly on the surface of the curd. This prevents a film from forming. Chill for 3 hours or overnight to set the curd.
For the Meringue frosting:
-->
4 large egg whites
1 cup granulated sugar
1/2 teaspoon key lime juice
1/2 teaspoon vanilla extract
1. Fill a small pot 2-inches deep with water. Set it over medium-high heat to bring to a simmer.
2. Combine the egg whites, sugar and cream of tartar in the metal bowl of a stand mixer or a heatproof bowl. Set the bowl over the simmering water and whisk continuously until the sugar dissolves and the egg whites are warm to the touch, about 5 minutes. Be careful not to cook the egg whites.
3. Remove the bowl from the pot of water and turn off the heat. Set the bowl in the base of the stand mixer fitted with the whisk attachment, or use a hand mixer.
4. Beat the egg whites at high speed until shiny and hold stiff peaks when the whisk is lifted, about 5 minutes.
5. Add the key lime juice and vanilla extract and whisk 2 minutes longer.
6. Fit a pastry bag with a small star tip and fill with meringue. Pipe the meringue onto the cooled cupcakes.
7. Use a small kitchen torch to toast the meringue.
It was my dad's birthday a few weeks ago, I was planning to post him some baked goods but thought it would be safer to bring them by hand, which led to a very late night baking session the day before we left which is why these pictures are not the greatest! Hopefully I have heavy sleeping neighbours who don't mind a KitchenAid whirring at 1am in the morning!
Like me, my dad is a huge coconut fan and also a fan of banana bread so I combined the two using this recipe I found while in the Caribbean. Apart from this time I had the added bonus of shredded coconut which I was super excited about. I also added a coconut glaze which made it even more moist than usual, and making it in a bundt shaped tin was a fun change too. It has been the highlight of the weekend so I can definitely recommend giving it a try!
Coconut & Banana Bundt cake:
1/2 cup desiccated coconut
1/2 cup shredded coconut
1 cup caster sugar
1 1/2 cup self raising flour
1 cup mashed banana
1 cup coconut milk
1 egg
1 teaspoon of vanilla extract
1. Grease and line your tin, and preheat your oven to 170°C.
2. In a large bowl combine dry ingredients.
3. Mash your banana and combine with the rest of the wet ingredients in a separate bowl.
4. Pour wet mixture over dry mixture and mix until combined. (it will look a little lumpy due to the chunks of banana and the coconut)
5. Place batter in your prepared pan and cook for about one hour until your cake is lightly browned and a skewer inserted in the centre comes out clean.
6. Allow to cool in pan for 10 minutes and then turn out onto a wire rack to cool completely.
For the topping:
2 tablespoons unsweetened coconut milk
1/4 teaspoon vanilla extract
1 cup icing sugar
1 cup shredded coconut
1. Whisk the coconut milk, vanilla extract and 1/2 cup icing sugar in a bowl until smooth.
2. Add more sugar as needed to thicken.
3. Sprinkle shredded coconut over the top.
The coconut theme continues...and I have a feeling it will do for a while now we've finally managed to source shredded coconut here in the UK - there is no stopping me!
I adapted my recipe from this one and after a little local hunt for graham crackers failed I ended up using shop bought pie crusts...they actually weren't too shabby! and the coconut filling tastes ah-mazing! I haven't managed to replicate the amazingness of the Coconut Cream Pie I had whilst in the Caribbean but it is certainly the best I've had in the UK!
Coconut Cream Pie Mini's
(Makes 8)
Mini tart cases
1 cup whole milk
1 cup coconut milk, well-whisked
1/2 vanilla bean, split lengthwise
2 tablespoons butter, cut into 4 pieces
3/4 cup sugar
1/4 cup cornstarch
3 large egg yolks
1 large (whole) egg
40g desiccated coconut
1. Combine the first four ingredients in a 2-quart saucepan, scraping out the vanilla seeds and tossing both seeds and pod in the pan. Place over high heat and bring to a boil.
2. Meanwhile, whisk the sugar and cornstarch together in a small bowl.
3. In the now-cleaned mixing bowl, whisk the egg yolks and whole egg. Whisk in the sugar/cornstarch mixture.
When the milk/coconut milk mixture comes to a boil, add 3/4-cup of it, whisking, to the egg mixture to temper.
4. Pour the egg mixture back into the saucepan, whisking, reduce the heat to low, and make constant figure-8s with a wooden spoon or heatproof spatula for about 90 seconds, or until the mixture thickens.
5. Pass through a strainer into a large bowl and fold in the desiccated coconut.
6. Add 80g of the coconut filling to each individual tart case.
For the topping:
2 cups double cream
80g coconut milk
1/4 cup caster sugar
Shredded coconut
1. Place heavy cream and coconut milk in mixing bowl, and whip on medium speed until it begins to thicken.
2. Slowly add sugar, increase speed to high and whip until stiff.
3. Add 50g of cream topping to each individual pie.