Showing posts with label chocolate. Show all posts

Monday, 21 September 2015

Chocolate Hazelnut Layer Cake with Nutella and Coconut Frosting!


We spent the May bank holiday weekend this year at my parents house in Shropshire.  I worked out that we would be there for my mom's birthday so of course I would have to make her a spectacular cake!

Her favourite chocolate bar in the world is Cadbury's Whole Nut...so I used that as my inspiration and the cake evolved from there!


The chocolate-hazelnut cake is made without any butter at all and the batter consists mainly of whipped eggs -the batter triples in size the longer you whip the eggs! I had never made a cake using this method before and I actually loved it! It was so fast and easy and the cake was unbelievably light and airy! 


The original recipe I was following filled the insides as well as the outsides with chocolate nutella frosting but I decided that might be too rich, so I whipped up some light and fluffy coconut frosting to go in between the cake layers and kept the creamy dreamy nutella frosting just for the outside of the cake! 

The cake was finished off with some chunks of whole nut chocolate and some chopped hazelnuts coating the outside.  

It was super delicious, and a must for any chocolate & hazelnut lover in your life!!

Also, I was featured last week as a top UK food blogger and if you head over to the site there's an interesting little infographic about reasons why people blog - I'm definitely motivated by food being my passion!!


Chocolate-Hazelnut Nutella & Coconut Whole Nut Layer Cake:
Serves 12-14
Adapted from Let the Baking Begin!

for the cake:
7 large eggs
1/2 cup caster sugar
2 cups finely ground hazelnuts
3 tbsp plain flour
3 tbsp cocoa powder
3 tsp baking powder

Preheat oven to 180 degrees C. Line 2 8 inch round cake tins with parchment paper and butter.  
In a medium size bowl, sieve the flour, cocoa powder and baking powder together.  Stir in ground nuts.
Whip the eggs on high speed in a free standing mixer, until frothy.  Slowly add the sugar and continue whipping until the mix has tripled in volume, for approx. 5 mins. 
Fold dry ingredients into the eggs, in 3 additions.  
Divide the batter evenly between the tins and bake for 20-25 minutes or until a knife inserted comes out clean.
Once baked, leave in the pan for 5 minutes and then transfer to a cooling rack to cool completely.
Cut each cake in half again so that you have four cakes.  

for the coconut filling:
465g icing sugar
150g unsalted butter
50ml coconut milk

Beat half of the icing sugar together with the butter in a free standing mixer.  Start on low, and turn to high until they have come together.
Add the remainder of the icing sugar and beat until incorporated.
Beat in the coconut milk.
Turn the mixer to high speed, and continue to beat for 5 minutes until the frosting is light and fluffy.

for the nutella frosting:
200g unsalted butter
1 1/4 cup chopped dark chocolate
1/2 cup nutella

Melt chocolate in microwave in 30 second intervals, stirring in between each time until completely melted.
Let cool to room temperature.
Whip butter, chocolate and nutella together until combined.

for decoration:
4 tbsp coconut filling
4 tbsp nutella frosting
12 single squares whole nut chocolate
1 double rectangle whole nut chocolate
1/2 - 3/4 cup chopped hazelnuts

To assemble:

Spread a thick layer of coconut filling in between each layer of cake.  Once all four layers have been assembled, cover the entire top and sides of the cake in the nutella frosting.  
Cover the bottom half of the cake in the chopped hazelnuts by grabbing handfuls of the nuts and sticking them to the frosting.  
In a small bowl, mix together the coconut filling and nutella frosting.
Spoon it into a piping bag fitted with a star tip.  Pipe 12 swirls - try and evenly pipe 6 swirls on each side of the cake in a symmetrical pattern.
Stick a piece of whole nut chocolate in each swirl.  
Pipe a larger swirl in the middle of the cake and stick a double piece of whole nut chocolate in the centre.

Eat and enjoy!

Sunday, 12 July 2015

Giant Birthday Snickers Cookie


It has been well documented on this blog that my husband loves cookies! I always want to bake him extravagant layer cakes when his birthday rolls around but he always requests the humble cookie instead! To sneakily do both I baked him up the cookie dough layer cake masterpiece back in 2012 but ever since I have just stuck to giant cookies…because if he wants a cookie, then I'll give him a cookie, but it will have to be a super size one! 


He loves snickers and I'd already made him a Toblerone one last year that never got blogged and a triple chocolate peanut butter one for Valentine's so I decided a snickers one would be a tasty birthday treat.  It is a lovely fail safe cookie recipe that I always use as my base and then you can just throw whatever mix ins you like in there.  If you were partial to caramel then I reckon some caramel swirled through or drizzled on top would be extra delicious but we're not really caramel fans over here so I opted just to keep it simple...


little chopped up snicker pieces thrown on top of some warm drizzled chocolate…

and finished off with a swirly wave of rich chocolate frosting and larger snickers bits!

The birthday boy loved it! so much so, that when some friends popped round unexpectedly later that evening and I asked him on the sly if he wanted to serve some of his birthday cookie to them he declined! apparently it was too good for sharing! 


Giant Birthday Snickers Cookie:
Serves 12-14
Adapted from Cooking Classy

2 3/4 cups plain flour
1 tbsp cornflour
1 tsp bicarbonate of soda
1/4 tsp salt
1 cup unsalted butter
1 1/4 cups light brown sugar
1/4 cup caster sugar
2 large eggs
1 1/2 tsp vanilla extract
2 cups chopped snickers bars
1 cup milk chocolate chunks

1/4 cup milk chocolate, melted
2 snickers bars

Preheat oven to 180 degrees C.  Grease large cookie tray with butter.
In a medium bowl, whisk together the flour, cornflour, bicarbonate of soda and salt.
In an electric mixer, beat the butter and both sugars together until pale and fluffy.  Stir in eggs one at a time, mixing after each addition.  Add vanilla.  With mixer on low speed, slowly add the dry ingredients and mix until combined.  Add chopped snickers and chocolate chunks and mix in with a spatula until incorporated.  

Break dough into four portions and drop into four corners of the tray.  Using your hands spread the dough out until it covers all of the tray and is relatively smooth on top.  Bake for 10-12 minutes until edges are lightly golden.  Remove from oven and allow to cool for 20 minutes.  

Melt 1/4 cup chocolate in a small bowl in the microwave in two 30 second intervals.  Once melted, allow to cool for a few minutes and transfer into a piping bag.   Drizzle over the cookie diagonally.  Chop one and a half snickers bars into slices, and chop the other half into tiny cubes.  Throw the cubes across the cookie on top of the drizzle.

Chocolate Fudge Frosting:
Adapted from The Novice Housewife

1/3 cup cocoa powder
1 cup icing sugar
60g unsalted butter
1 tbsp milk
1 tsp vanilla

Sift the cocoa powder and icing sugar together in a mixing bowl.  
Add the butter and beat on low to incorporate the ingredients and then turn up to high and beat for 4-5 minutes until fluffy.  Add the milk, half a tablespoon at a time until desired consistency is reached.  Stir in the vanilla at the end. 
Transfer to a piping bag and pipe frosting around the edge of the cookie.

Use the snickers slices you chopped up previously and place them flat down on top of the frosting, one after each swirl of frosting.

Eat and enjoy!

Tuesday, 9 June 2015

Ferrero Rocher & Nutella Banana Bread!


So you know I'm on this mission to add Nutella and Ferrero Rocher's to every single one of my favourite bakes! and Banana Bread is one of my go to recipes so it was only a matter of time before it got a 'Roch-ella' make over! 


I baked this up one Friday night a few weeks back, we had some friends coming over for lunch the following day and I thought it would be a perfect afternoon snack for them.  As I was chopping all these Ferrero's I thought to myself there is no other way I would want to be spending my Friday night! It was a perfect little moment of baking joy, so I snapped a pic just for you…and for me, to remember that happy little thought! Don't you just want to delve in head first?? I was particularly impressed with myself that I didn't sneak one crumb of Ferrero goodness into my mouth, I am learning self restraint painfully well while on my diet at the moment! 


Actually looking back, it was a rather torturous bake to make and not indulge in, that Nutella spoon was just waiting to be licked! I guess the motivation of knowing I would be allowed a piece the following day made it all worth it! Don't you think every bake should be generously drizzled with oozy gooey Nutella right before being popped in the oven? If you're not so sure…we probably can't be friends, and you should probably stop following this blog, haha! 


I did have a go at making a Nutella banana bread last year some time but I went way over board on the amount of Nutella I baked in and it left the middle of the loaf a little uncooked, so moderation is key to make this one work.

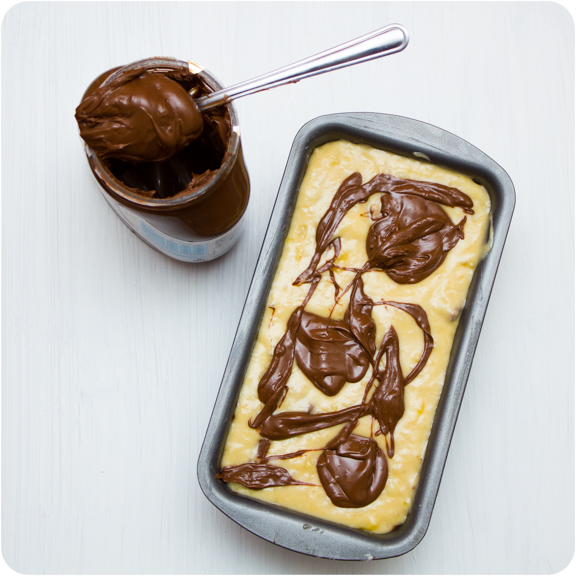
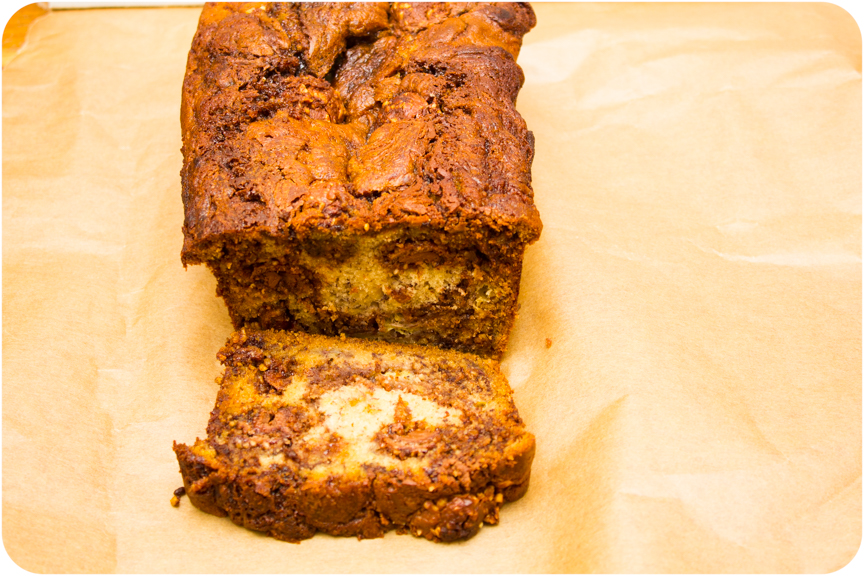
I love the swirly ribbons of Nutella you see throughout the bread...


and those Ferrero's peeking out take it over the top! Just when you thought banana bread couldn't get any better it can! This was totally delicious and the pairing of nutella and bananas is one I love, and with the addition of the Ferrero Rocher's you just can't go wrong!! 


Ferrero Rocher & Nutella Banana Bread:
Serves 10
From Cupcake Crazy Gem

250g plain flour
165g caster sugar
1 tsp bicarbonate of soda
1/2 tsp salt
5 tbsp unsalted butter
2 large eggs, beaten
3 large bananas, mashed
65g banana yoghurt (use plain if you prefer)
1 tsp vanilla extract
12 ferrero rochers
160g nutella

Preheat oven to 180 degrees C.  Grease a loaf tin.

In a large bowl, whisk together the flour, sugar, bicarbonate of soda and salt.  Set aside.

Melt the butter in a small bowl and add it to the bowl of the mixer.  Once the eggs have been beaten in a small bowl, add them to the mixer too.  Mash the bananas and add them along with the yoghurt and vanilla extract to the mixer.  Beat on medium speed until everything has been incorporated.  

Add the dry ingredients in two batches, beating on low-medium speed until everything is combined - do not overbeat.

Chop the ferrero rochers into halves using a sharp knife.  Reserve 6 half pieces of ferrero rocher back for decoration, and with a spatula stir the rest into the batter.

In a small microwaveable bowl, heat the nutella for 30 seconds until slightly soft. 

Pour half the batter into the loaf tin.  Spoon half of the nutella on to the top of the batter, and using a knife swirl it through the batter.  Add the remaining batter and repeat with the rest of the warmed nutella on top.  Add the 6 ferrero halves.

Bake for 55-60 minutes, or until a knife inserted comes out clean.  There will be pockets of nutella so make sure you don't test it where the nutella is.  

Leave in the loaf tin for 10 minutes, and then transfer to a wire rack to cool completely.

Eat and enjoy…and if you want to eat it like me zap each piece in the microwave before eating for 15 seconds and slather in butter. Yum!

Tuesday, 2 June 2015

Toblerone Mousse: Only 3 Ingredients!


Oh Toblerone - you have won my heart! in any shape or form, but mostly in the largest triangles possible! Do you ever find that you buy the slightly smaller sized bars and it's just not the same! for me it has to be the large bars all the way! 

Considering how much I love Toblerone it hasn't made too many appearances on my blog, and the only reason I can think why is because when we buy one of those large bars it doesn't hang around long enough in our house to be baked into anything! 


So I bought the Toblerone in for this on the day of the dinner party we were serving it at! to try and make sure I was restrained enough to not eat it before it was needed!

Mousse is always something that can strike fear in people, but this mousse is seriously easy - only 3 ingredients and it can be whipped up in less than 15 minutes! and it has Toblerone melted into the mousse and scattered on top - what's not to love! 


In fact it's so easy and quick to make, and the results are SO delicious that it's going to be a dangerous new find around these parts! 


Toblerone Mousse:
Makes 12
Adapted slightly from Phoodie

400g milk chocolate toblerone (you can use dark if you'd prefer)
2 cups double cream, as is
210g white marshmallows
2.5 cups double cream, whipped
250g milk chocolate toblerone, for decoration

Chop the 400g milk chocolate toblerone into chunks and add it to a measuring jug or small microwaveable safe bowl.  Add the cream straight from the carton and add the marshmallows too. 

Microwave on high for three minutes, at thirty second intervals, stirring each thirty seconds to ensure it does not burn.

Once all the ingredients have melted and incorporated together (in your microwave this may take less than three minutes) remove the mixture and give it a good whisk.  Set aside and let it cool.

While cooling, whip the additional cream to soft peaks and chop the additional toblerone. 

Using a spatula fold in the two cups of whipped cream to the toblerone mixture.  Use a whisk at the final stages, and ensure that no lumps of cream remain (there may be small lumps from the nougat in the toblerone and this is fine).  

Refrigerate the half cup of whipped cream leftover until ready to serve.  Divide the toblerone mixture into twelve ramekins and refrigerate for eight hours, or leave overnight to set.

Just before serving, top each mousse with a spoonful of the whipped cream and sprinkle with the toblerone chunks.

Eat and enjoy!  

Friday, 15 May 2015

Nutella Swirled Chocolate Hazelnut Chunk Cookies!


So unless you've been living under a rock, I'm sure social media has made you aware that it is national chocolate chip cookie day today! I simply couldn't let this 'food holiday' pass by without paying homage to that classic cookie! 

Choc chip cookies are one of the things my mom baked most when we were growing up...and then when my older sister was old enough she started whipping them up too so there was always a good chance of finding a fresh batch in the kitchen! Whoever invented chocolate chip cookies deserves a giant trophy and a medal, make that a million medals...they've paved the way for cookie goodness forever! I like my desserts to be on the extravagant side, but even I can't turn down a simple humble chocolate chip cookie - they are timeless classics! and I think they are the kind of sweet treat that will be peoples favourites forever! 


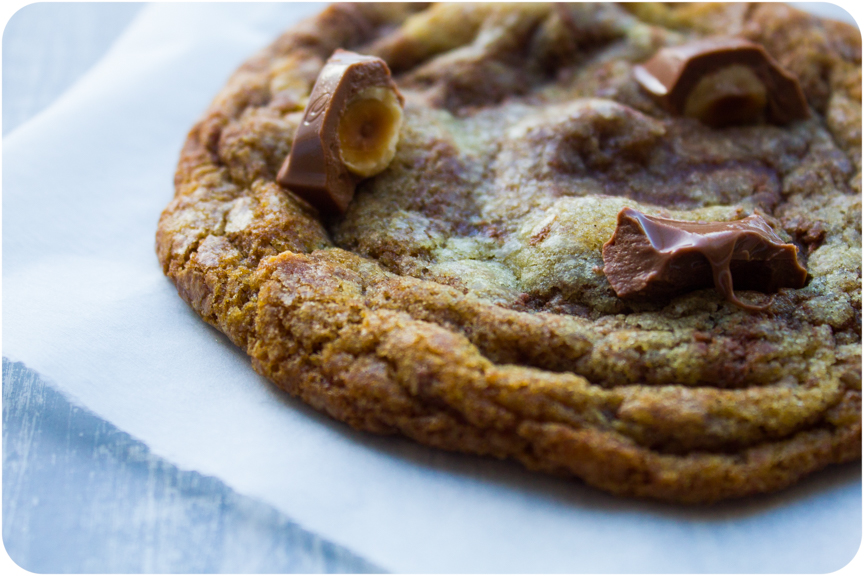
On that note...let me introduce the humble chocolate chip cookie's older and crazier sister - the Nutella swirled chocolate hazelnut chunk cookie! yes you read that right.  Let's take a minute to break this down.  You start off with a brown sugar cookie which by itself would be delicious enough...but then you swirl a ton of dreamy creamy Nutella through the dough, and instead of just adding regular chocolate chips, you pimp it up by adding chocolate chunks because everyone knows chunks make a superior cookie! but not just any chunks, oh no...we're adding in Cadbury's whole nut chunks! so that to compliment the Nutella you have actual hazelnuts in your cookies too! 

I mean, if that description hasn't lured you in, I don't know what will! 

You need to bake these today! Sally, who invented this cookie on her blog shared a picture of them to instagram and that very same evening I just had to bake a batch because they looked too good not to! I then baked another batch two days later which is rare in this house, but we ran out of them so quick that it was essential to make more!! 

Don't say I didn't warn you, these are dangerously addictive! and will probably become your new favourite cookie! They are definitely the BEST cookie I've made this year! 


Nutella Swirled Chocolate Hazelnut Chunk Cookies:
Makes 18 

1/2 cup (115g) unsalted butter, room temperature
3/4 cup (150g) packed light brown sugar 
1/2 cup (100g) caster sugar
1 large egg + 1 egg yolk
1 tsp vanilla extract
1/2 cup (148g) Nutella, divided
2 1/3 cups (295g) plain flour 
1 1/4 tsp bicarbonate of soda
1 tsp cornflour
1/2 tsp salt
1 1/4 cups (225g) whole nut milk chocolate, divided

Preheat oven to 180 degrees C. Line three large baking sheets with parchment paper or silicone baking mats.  

In a free standing electric mixer fitted with a paddle attachment, beat the butter for 1 minute on medium speed until creamy.  Add the brown sugar and caster sugar and beat on medium high speed until fluffy.  Beat in egg, egg yolk, and vanilla on high speed until combined.  Stir the Nutella in the jar vigorously before using so the oils are not lurking at the top as this will cause your cookies to spread.  Beat in 1/4 cup (74g) of Nutella until combined.  

Whisk the flour, cornstarch, bicarbonate of soda and salt together in a large bowl.  On low speed, slowly mix into the wet ingredients until combined.  Chop chocolate into chunks.  Add 1 cup (180g) of whole nut chocolate chunks and mix on low for about 5-10 seconds until evenly distributed.  Turn the mixer off and add the remaining Nutella.  Beat for 5-10 seconds so the Nutella streaks through the cookie dough and is not fully mixed...be careful not to overbeat.  Dough will be a little crumbly but that's not a problem. 

Roll dough into balls, larger than a tablespoon.  The warmth of your hands will help them come together.  Bake the cookies for 10 minutes, until slightly golden brown around the edges.  Rotate the sheets once during baking time.   The baked cookies will look extremely soft in the centre when you remove them from the oven.  Allow them to cool for 5 minutes on the baking sheet.   Gently press the remaining chocolate chunks into the tops of the slightly warm cookies (this is purely for looks!)

Transfer cookies to a cooling rack to cool completely.  

Tuesday, 5 May 2015

A Hello Kitty 1st Birthday & Hello Kitty Macarons!


My little Ella turned 1 in February! and for as long as I can remember one of the things I was most excited about for becoming a mom was the parties I was going to be able to throw for my children! My mom always threw us the best parties growing up! 

Ella is a huge fan of cats, and after receiving quite a lot of Hello Kitty prezzies at Christmas time she suddenly became very interested in Hello Kitty and since I've always been a fan too it seemed like the perfect theme! 

I was so in love with these polka dot confetti balloons that came all the way from Abu Dhabi! 


Is anyone else in love with chevrons? I am! So I was super excited to find this chevron scrapbooking card in the exact colours of the party! I made a little monthly bunting of all the growing up pics we took of her each month.


I made this tissue paper garland thanks to a tutorial from you tube! it was super easy! 


and the birthday girl wore a special Hello Kitty dress for the occasion too! 


My sister made these delicious coconut cupcakes topped with raspberry frosting...


and ordered these super cute toppers to go on them that my husband designed.


We used them on the jars for the drinks too, on top of these gorgeous doilies taped with chevron tape of course (a pinterest inspired craft there!)


and no parties complete without some stripey straws!!! 


and dipped these chocolate oreos in white chocolate and drew on their little Hello Kitty faces.


I also dipped these pretzels and gave them a little Hello Kitty twist!


but my real masterpiece were these Hello Kitty macarons! More on them in a minute...


My sister helped me whip up this 6 layer chocolate cake filled with pink ombre swiss meringue buttercream and covered in chocolate swiss meringue buttercream.  If there is one thing I hate it's fondant! and I know typically children's birthday cakes involve fondant but I wanted to make sure there was no fondant in sight at Ella's party, just yummy edible and delicious treats! and how cute was the bunting Auntie Mara made too?!


It was soon time to cut the cake and it was going to be Ella's first ever taste of cake and chocolate! I was excited! but do you know the little rascal didn't even like it! All that time and effort and thought that went into the cake and she couldn't care less!! haha! Hopefully next year she'll be more excited for her cake!! 


The adults still enjoyed it though!! That frosting was so creamy and dreamy! 


She was much more excited about present opening! and we even made a fun little Hello Kitty Photo Booth area too! 


It was a lovely day spent with all her family, with pulled pork topped dogs for lunch with homemade guac and a whole lot of treats obviously!! 

So...back to those tricky little macarons! I always knew macarons came with a certain aspect of horror from many bakers...as they are typically known as not easy little treats to master! So I was fully anticipating they probably wouldn't go right first time...

I didn't think I'd have to make them 4 times to get them right in the end, but hey! I think my final version turned out pretty good!


What was wrong with the previous versions...well one was totally flat, the others were way overdone, the 3rd batch were less flat but still browning around the edges (I was trying to make them just white) so I tinted the batter a slight pink and this prevented them from browning....and yes the fourth batch had feet - hurrah! victory! 

I was inspired by Java Cupcake's adorable Hello Kitty macarons and used her template sheet to pipe them on but my first batch using her recipe was a flop so I changed recipes.  It might have been that my technique had just been wrong first time around but I didn't want to take any chances.

Eventually, it was this recipe and this youtube video that made everything come together and turn out great! There is also an FAQ on macarons that you should read too just to be thorough and fully prepared! 


Hello Kitty Macarons:
Makes 24 Macarons, 48 shells

3 egg whites
210g icing sugar
125g almond flour
30g caster sugar

Red gel food colouring
24 yellow chocolate beans (like mini smarties)
48 red heart sprinkles
Edible glue
Black edible food pen

Print out the Hello Kitty template pattern.   Lay it on a baking tray. Tape a piece of parchment paper over the pattern.

Measure out your ingredients very precisely.

Sift the icing sugar and almond flour together through a sieve into a food processor.  Blitz for 2 minutes.  Stop and scrape down the side of the processor with a spatula.  Blitz again for 1 more minute to make sure it is as fine as possible.  Sift half the sugar and flour mixture into a large bowl.  Throw away any larger bits of the almonds that remain in the sieve to ensure a smooth batter.  Sift the second half of the sugar and flour mixture.  Set aside for later.


Beat the egg whites in the bowl of an electric mixer.  When the eggs are bubbly and the whisks are leaving marks, add the caster sugar slowly over the next minute or so.  Keep on beating at medium-high speed for 3-4 minutes until the egg whites are stiff.  (It is really helpful to watch the youtube tutorial I linked to above because it shows you pictures of what each stage needs to look like).  It is only stiff enough when the peaks hold themselves, if they fall back into the mixture you need to keep beating.  

Add food colouring, a few drops at a time - a little goes a long way.

Using a spatula, fold the egg whites delicately until the colour is well incorporated.  

Add a third of the almond/sugar mixture to the egg whites and keep on folding delicately - never beat.

As you incorporate the almond mixture, the batter seems to curdle, but as you fold it becomes creamy again.  

Keep on adding the almond mixture and folding to incorporate it, so no pockets of dry ingredients remain.  

In the end the batter will be quite thick, shiny and creamy.  

Spoon the 3/4 of the mixture into a piping bag fitted with a large round tip.  Pipe out the circle of the Hello Kitty faces.  To make round macarons easily, keep the tip very close to the parchment paper and lift off quickly when enough batter has come out.  


Spoon 1/4 of the mixture into a piping bag fitted with a Wilton #4 tip and pipe the ears onto the already piped out circles.  

Once all the macarons are piped out, bang the sheets against the worktop to the let the air bubbles out and flatten the shells.

Don't forget to slide the template out from under the parchment paper before baking.  

Let the macarons rest for at least 20 minutes.  Preheat oven to 150 degrees C. 

Bake the macarons for 14 minutes.  To test their doneness, tap lightly on the shell.  When ready, they are firm on their feet. 


Let the shells cool completely before removing them from the parchment paper.  They should be easy to lift off.  

Using edible glue, brush a little on the back of the yellow chocolate beans.  


Stick them in the centre of the macaron.  

Using an edible black food pen, draw the whiskers and eyes on.  Brush some edible glue on the back of two red heart sprinkles.  Arrange them across the ear of the macaron so it looks like Hello Kitty's bow.  Wait for about 30 minutes for the glue to set and the face to be ready.

Fill the shells with whatever filling you fancy.  Ganache works great.  I filled them with some of the leftover chocolate swiss meringue buttercream from the cake.  

Sandwich the shells together.  

Store in an airtight container until ready to serve.  They are best served soon after piping the filling because if you leave them filled for too long the filling can make the shell soggy.  

Eat and enjoy, and pat yourself on the back - you just made macarons! hooray! 

Monday, 20 April 2015

Malteser Bunny Chocolate Malt Mousse Pie


My name's Gem...and I'm addicted to Malteser bunnies!! So much so that when I saw them roll around on the shelves sometime in February I grabbed a few bags of the minis knowing they would make an excellent Easter dessert! Wrong! Of course we hunted them out in my baking cupboard one night when we were in need of a Netflix accompanying chocolate fix! Never mind I said, I'll buy more! So it's the evening before Easter Sunday and I ask the lady in Morrison's where their Easter aisle is and she tells me it doesn't exist anymore!! Fortunately they had a few lone bunnies left by the tills so I grabbed those..and decapitated them so they would fit in my tart! Note to self: don't eat the contents of your baking cupboard without assurances you will find back up!!

It wasn't a big deal in the end - half the bunny for my pie the other half for my mouth - everyone's a winner! Except for the bunny I guess.


This Oreo crust takes the pie to the next level of decadence! and the chocolate ovaltine mixed into the mousse gives it that nice malty kick. There was no need for pouring a whole bag of maltesers in the middle of the pie...other than the fact that my mantra is you can never have too much chocolate! you could equally cover the whole thing in cream instead because it is tooth achingly sweet (in the best kind of way) and the cream does help to cut through the sweetness...but please sprinkle a few maltesers on top at least if you do!


This was the perfect end to our Sunday roast lamb feast and it was the perfect sugary fix to get our bellies ready for the sugar coma of chowing down on our chocolate eggs from our egg hunt that was to come!


Malteser Bunny Chocolate Malt Mousse Pie:
Serves 10
Adapted from Beyond Frosting

for the crust:
275g Oreos
6 tbsp unsalted butter

for the filling:
225g cream cheese, cold
60g dark chocolate
1 tbsp unsalted butter
65g chocolate malt powder
115g caster sugar
2 tbsp double cream

for the decorating:
315ml double cream
65g cup icing sugar
7 Malteser bunnies
175g Maltesers

Grind up oreos in a food processor until they resemble fine crumbs.  Melt the butter in the microwave for 30 seconds and stir in with the oreos.  Press the oreo mixture into a 10" tart pan.  Refrigerate crust until filling is ready.

Remove cream cheese from fridge and beat on medium speed in an electric mixer for two minutes until light and fluffy.  Scrape down the sides of the bowl.

In a small microwave safe bowl, combine the chocolate chunks and butter.  Melt for 30-60 seconds and stir until chocolate is melted and smooth.  Pour melted chocolate over cream cheese and mix to combine.

Add malt powder and caster sugar to the cream cheese mix and beat well until incorporated.

In a separate bowl, whip 350ml double cream together with the icing sugar.  Remove 2 tablespoons of the whipped double cream and fold it in to the cream cheese mix.  Cover the rest of the cream with clingfilm and refrigerate until ready to serve.

Pour chocolate malt mousse filling into the oreo crust and let set in the fridge for 3-4 hours.

Just before serving, remove the whipped cream and put it into a piping bag fitted with a star attachment.  Pipe around the edge of the pie.

Cut the heads off the malteser bunnies, or if using minis use the whole bunny.  Place alternately in the swirls of cream.  Place a single malteser in the other swirls.

Using a sharp knife, chop some of the maltesers in half.  Pile up the half and whole maltesers in the middle of the pie.

Eat and enjoy!

I am sharing this for Cook, Blog, Share over at Super Golden Bakes

LinkWithin

Related Posts with Thumbnails