Friday, 29 July 2011

Some tasty treats from Outsider Tart


Last week some root beer was called for (for something you will get to see in my next blog post!) and so I could think of no better place than to go and get my fix than at Outsider Tart...because obviously I could buy ridunculous amounts of yummy treats to go with it!


When we got there I was delighted to find sooooo many goodies on display, it cemented the fact that it really is my favourite London bakery.  There had to be at least 5 different brownies on offer alone! This treat caught my eye because of the lucky charms hidden inside...which are a fave of mine! It was a yummy marshmallow krispy treat, and it was huge...just check out the size of it! It certainly wasn't for the faint hearted and I could feel the sugar destroying my teeth as I devoured it, but that's not necessarily a bad thing in my book!


Next up was the Snickers blondie, which was just amazing! Snickers is one of my favourite treats when you turn it into a baked delight and this blondie was packed full with choc, caramel and peanutty goodness!


I finally tried an Outsider Tart cupcake...and it was so good!! As if you couldn't tell by that delicious layer on top it was a lemon meringue, filled with a lovely lemon curd type filling....


and to finish, this was Mara's choice, and I can't exactly remember what they said it was but it was like a mini muffin covered in cinnamon and sugar and it really reminded me of a Churro so I was loving it!

All in all, it was a really good call to spend one of our evenings trekking out to Chiswick High Rd! and the icing on the cupcake was being able to have an ice cold glass of root beer when we got home!

Saturday, 23 July 2011

An Alice in Wonderland cupcaking party....a success!


So last weekend was one of my best friends hen-do's.  She is a cupcake lover, and her sister who was in charge of organising the hen had asked me if I would do a cupcake class for all of the guests in attendance (25 in total!!).  I had to think about it for a second, remember how badly my last cupcake party went.  However I decided that since this time around all my guests were 25 plus that it might be calmer and go more smoothly! plus I can't say no!


I took the day off work because there was alot of getting ready to do! and whipped up 50 cupcakes, half of the hens favourite Martha Stewart Brownie Recipe and half were vanilla (using the recipe from The Primrose Bakery book).  I also whipped up 8 different kinds of frosting, the three you can see above are rainbow coloured vanilla frosting, oreo cream cheese (which was a definite fave on the day) and chocolate.


I wanted there to be TONS of edible goodies on offer so that everyone had a big variety to choose from. So along with the standard jimmies, sanding sugars and sprinkles I also had marshmallows, shredded coconut, mini Oreos, Peanut Butter Cups, Reece's Pieces, M&M's, Maltesers, Cadbury's Buttons and chocolate chips to name a few! 


I also set up a little fondant area for the more adventurous cupcake creators out there.  I printed out some pictures of Alice in Wonderland style cupcakes I had found online as inspiration...


and I had a giant pack of white fondant along with all my different colour gels so everyone could get mixing, and then I pre bought the black and red because everyone knows those colours can be tricky to make for even the more experienced of us!


Then the guests started to arrive! and the excitement began!! All of us had been made these amazingly cute aprons, and our names had even been embroidered on! 


After a brief demo of how to create perfect frosting swirls, everyone was let loose to create whichever kind of cupcake they wanted to! 


Jade created these four beauties here...I was very impressed! 


and even more impressive was the amount of people getting involved with fondant! 


Rose created this fantastic Cheshire Cat cupcake that she even managed to colour co-ordinate with her outfit! 


At the end of the decorating everyone got a little box to take one cupcake home in, and then everyone chose one cupcake that they were going to get to eat at our afternoon tea.  Here is the tray with all the cupcakes people were going to eat! 


Let's get a close up on all that deliciousness! 


We headed out to the garden to commence all the yumminess! The marquee was decorated out beautifully with handmade polka dot bunting, and some were even in the shape of teapots! Here is the Hen herself (dressed up as Alice).

It was the most fun and definitely most delicious hen party I have ever been to! If you want to find out more about what else we did you can see my full round up here.

Wednesday, 20 July 2011

Dixie's Cupcakery...a brand spanking new Cupcakery in St.Albans!


This past weekend found me in my old stomping ground of Harpenden for a friend's amazing amazing hen do, which I will blog about in more cupcake detail later in the week!

I was also able to visit an old Uni friend of mine who now lives in St.Albans and fortunately for me, being the great friend she is, she has her finger on the cupcake pulse! and she was ready to alert me of a new opening!

So we headed off to Dixie's Cupcakery which co-incidentally is just across the road from the Tearoom I worked at all through my teen years and where my love of cake truly began!

They had 10 different flavours on offer, there were some pink champagne ones on top of the counter top I missed out of this pic.  That's a pretty good selection for any cupcakery, and it was good to see some more interesting flavours in there like Banoffee and Oreo (my old time favourite)!


So we went for an Oreo, and I was pretty impressed that at £2.50 a cupcake they even included this lovely little housing for my cupcake so it didn't get squashed on the way home - London cupcakeries take note! Their prices were very reasonable with their standard range of cupcakes being only £2.


Let's start with the good points, my cupcake was nice and bouncy as I took it out the container - always a good sign of how fresh and moist a cupcake is! and would you check out that frosting:cupcake ratio...being the frosting lover I am that was a huge plus! and what a frosting it was...creamy and delicious with a great Oreo taste.  It was all going so well for this little cupcake! Until we came to the Oreo at the bottom, which usually I am a huge fan of! It's exactly how I like to bake my Oreo cupcakes but I usually only put a half of the Oreo in the bottom, not the whole one and perhaps my cupcake liners are of a higher quality because the problem was the cupcake liner stuck to the cookie and it was really hard to pull it off.  It even left a little bit of cupcake liner behind stuck to my cookie! and the cookie was super hard at the bottom - again I think if just half the cookie had been put in it would have softened up during baking.

This was, however, a minor complaint because all round I absolutely loved this Oreo cupcake and this cute little Cupcakery.  One of my favourite things about it was the awesome uniforms that the staff wear and the lady who served us was super friendly and told us how all the cupcakes are baked fresh on site in a little kitchen upstairs - now that's what we like to hear!

So for anyone in Hertfordshire be sure to check them out, they're worth the trip and after my bad experience at Yummy Mummy Cupcakes I'd be heading to St.Albans every time for my cupcake fix!

Sunday, 10 July 2011

A Chubby Hubby: Triple Choc & Coconut cookie


So you may recall from my post last week the wonderful story of the 'Chubby Hubby' cookies from my Outsider Tart baking class.

It didn't take us long to get around to making them, with the first batch being made the same evening of the class!! (but we ate them all up without taking any pics!) So mid week we were having serious withdrawls and knew we needed to whip up another batch!

I am seriously considering renaming these to 'Chubby Wife' cookies since that's what I'm going to become if I keep baking them up as fast as I have been!  I'm already dreaming up what I'm going to do with them next time I bake them!


They are traditionally made with nuts: a mix of pecan and walnuts but I'm not a big fan of nuts so I omitted them this time around, and I added some shredded coconut because I'm obsessed with the stuff!


It worked so well with these cookies and they were amazing! I'm pretty sure I ate around 5 of them the night we made them...they certainly didn't last long. 


It was suggested that in place of nuts to add some extra crunch, rice krispies would work well.  For my last batch I put in the oven I added a handful of rice krispies to test it out.  It didn't make the cookies look as pretty as the others, and for my tastebuds it didn't really work so much so I'm happier without the crunch but if you need that crunch then feel free to add 75g of nuts/rice krispies to this mix as well.

Chubby Hubbies:
Makes 18 cookies

75g Unsalted butter
230g Valrhona chocolate (68%)
2 Large eggs
150g Granulated sugar
3/4 tbs Vanilla bean paste
50g Plain flour
1/4 tsp Baking powder
A pinch of salt
75g Valrhona white chocolate chunks
75g Milk chocolate chunks
45g Shredded coconut

Preheat oven to 180 degrees C.
Melt the butter in your pan first. Then add Valrhona chocolate, stirring frequently to avoid it burning.  Remove from the heat and set aside to cool.
With a paddle attachment on medium speed, beat together the eggs and sugar until light and fluffy (and ropey!).  Add the vanilla and cooled chocolate mixture.  Beat on medium speed for about 2 minutes until the dough is thick and glossy.
Add the flour, baking powder and salt - mixing until just incorporated.  Stir in the chocolate chunks and shredded coconut with a spoon.
Let the dough rest for 15-20 minutes to facilitate scooping.
With a large ice cream scoop (or if yours is in Shropshire like mine was, a tablespoon can work too!) drop dough balls onto the lined baking sheets, keeping at least 2 inches between cookies.
There should be no more than 6 cookies per sheet, with wet fingers gently flatten each dough ball.
Bake for about 15 minutes until the tops crack and become glossy.  To the touch they will seem underdone. 
Allow the cookies to cool on the baking sheet for 5-10 mins before placing them on wire racks to cool completely.


You really do have to make these! They will be some of the best cookies you'll ever make! Thanks to David and David for sharing their delicious recipe with me, and for the endless possibilities that can be created by making them your own - and adding whatever you want to them! Let me know if you give them a try, I'd love to see what you do to them!

Happy baking!

Monday, 4 July 2011

An Outsider Tart Cooking Class...and a Giveaway Winner!


On Saturday we spent an amazing morning at Divertmenti Cookery School in Marylebone with none other than David and David, the owners of Outsider Tart Bakery on Chiswick High Rd.

You may recall I visited them once on one of my cupcake hunts, and whilst I didn't try one of their cupcakes I did try lots of their other baked goods which were all delicious! and after many of the mediocre cupcake bakeries I have visited recently in London I have decided Outsider Tart has to be up there as one of my favourite London bakeries so I feel pretty sad I've only visited them the once! Chiswick is pretty far out from us, I know it's a poor excuse, especially since I'm living in London now so I have made it a goal to visit them very very soon...if not just to experience one of their Thursday night cookie bar's! 


Let me introduce you to David no 1, David Muniz...this picture, and awesome facial expression just about sums him up completely! He is completely passionate about baking and his enthusiasm just shines through, as does his sense of humour! There was a number of lovely little anecdotes to do with their personalities and baking styles and the way they balance chores at home! David likes to be a little less accurate than most with his following of recipes and he tends to deviate alot, like deciding to make the Kunegunda cake with strawberries and raspberries rather than apple which is what was stated on our recipe file! and he likes to throw caution to the wind and walk on the baking wild side by breaking his eggs straight into the mixing bowl (rather than into a seperate bowl first incase of any accidents!) all the while instructing us to do the opposite.  Yes, he may not practice what he preaches but since he's the pro and I'm the ammateur I'm inclined to follow his example nonetheless!


That brings me onto David no.2, David Lesniak - an altogether more serious character with a more dry witted sense of humour than David no.1 but the Davids' contrasting personalities set them up perfectly as a little comedy duo! He doesn't seem to appreciate the big messes David no.1 creates in the kitchen at home as he is always the one who has to clean them up! and he is rather obsessive about things being orderly...even to the point of having to methodically measure out the portions in the tray bakes they make for their bakery to ensure every slice is of equal size!


We were taken through 3 recipes with them in the 2 hour slot that we were there for.  All of the recipes come from their book, Baked in America, which is due for release on August 4th but we've already pre ordered our copy from Amazon because we're just that eager! (and you get a great discount on the price!) We got given copies of the recipes to take home so I will definitely be sharing some of them with you over the next few weeks (we already whipped up a batch of those delicious looking cookies above last night but we ate them so fast that no pictures were taken!) and we got to browse through a copy of the book which only cemented our excitement for the book because everything in it sounds and looks so tasty!

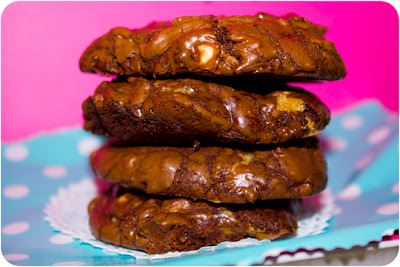
I love the story that accompanies these cookies! At Outsider Tart they are known as XXX rated chocolate chip cookies, but they hail from a cookie the Davids fell in love with when they lived in New York.  There was a bakery right across the street from them that sold cookies called 'Chubby Hubbies' - don't you just love the name! and they were David no.1's favourite treat.  When they moved to England and wanted to start up their bakery they got in touch with Mary, the Cuban lady who had owned the bakery, and they found out it had closed down and she had gone down a completely different career path.  So they asked whether she might like to share her recipe, but they were met with a resounding no, so they set to try and recreate the chubby hubbies the best they could. 


They told us their version comes close, but they have never been able to successfully incorporate the mini marshmallows that were in the original cookie so it's not quite perfect yet, although after sampling some bite size versions we thought it tasted pretty delicious to us! and we even got to try some of the gooey melty ones that were fresh out of the oven! as did David no.1, sneakily shovelling in mouthfuls of the cookie behind David no.2's back - it was quite amusing to watch and I wish I had caught it on camera!


The next recipe they showcased was called 'Kunegunda's cake'.  We had been wondering for weeks leading up to the class what would be in this cake! We had even tried googling it and were rather confused when we couldn't find out any information! but we've since found out Kunegunda was in fact the name of David no.2's grandma so that would explain why google was of no help to us!

The 'cake' infact starts life as a pie because you begin by making dough, yet somewhere in between the baking stages it turns cake like and so it's a very intriguing dessert indeed! It can be made with any kind of fruit you desire! The one we sampled on the day was made with strawberries and raspberries which paired perfectly with the lovely summer's day it was, the original recipe calls for apples, and David and David gave many more recommendations of combos like strawberry & lemon, mango & blueberry or raspberry and peach...all tasty alternatives.

David and David have alot of baking wisdom between the two of them and I picked up alot of tips on the day that I furiously scribbled down on my recipe file.  One of the things they said that I liked the most was that their book, and recipes in it, are not concrete and you don't have to follow them exactly - in fact they want you to experiment and add your own touches to each recipe.  Alot of the baking they do comes down to how they feel on the day, and to do with what feels right when you are baking, use your intuition to help you create the yummiest treat possible, and it's all down to personal preference.


The treat we ended the day with, and indeed the treat we began with (because it took quite a long time to make!) was the rather lovely looking crowd pleaser: The Apple Stack Cake.

This is definitely a special occasion cake.  It's not something you can just whip up in one evening and it can, and should, be made over the course of several days because by assembling the cake the day before you give the apple filling time to really soak into the cake.


Here they are dishing us up a very generous slice of the cake to take on our way as we left! I was sad that the time flew by so quickly but glad that I was able to attend and went away armed with new tips and baking enthusiasm...and anticipation of their books arrival!

I'll leave you with a few of the Davids' top tips:

1. Melt your chocolate in a saucepan...straight on the hob! (yes, despite getting many looks of horror coming his way from the French men at Valrhona it is the way that David no.1 always does it) it is quicker and if you melt your butter first and then add the chocolate the butter acts as a protective layer so your chocolate won't burn.  Also, leave a few morsels of chocolate unmelted and then once you take your pan off the heat they will melt into your mix anyway.
2. Use the paddle of your KitchenAid to scrape down the sides of your bowl, this process also ensures any unmixed flour/sugar that is stuck to the paddle will be dislodged in the process...and it creates less washing up than using a separate spatulat (which pleases David no.2 greatly!)
3. When it comes to chocolate only the best will do - Valrhona all the way.  When it comes to Salt - go Kosher, it distributes better through your cake than regular table salt which can sometimes sink to the bottom. 
4. Don't ever prick your cakes in the middle with a cake tester/knife to see if they're done.  It scars their surface! and a simple old fashioned prod with two of your fingers will do the same job, if the cake bounces back then it's done and there's been no stabbing involved!

and before I forget! the winner of my cheesecake giveaway was...

Comment no. 10 - The More Than Occasional Baker!

Your wish of receiving a salted caramel cheesecake has come true, just let me know your email address so I can contact you to arrange delivery! Thanks to all who entered.

Sunday, 3 July 2011

Happy pre 4th of July!


Happy 4th July to all my American followers and friends! I know we're not quite at the 4th yet but I know lots of you have been celebrating all weekend already! I joined in the fun by heading to Lola's at Selfridges and picking out one of their American flag cupcakes (because after all I am a wannabe American)


I was also keen to try their new flavour of the month since for the past 2 months they have involved alcohol or caffeine - not so fun for all their mormon fans! For July, they are serving the Salted Caramel cupcake and I was definitely impressed! It was a very tasty cupcake, although perhaps the sweet/salt balance wasn't quite right. The caramel cupcake was great and the caramel frosting was delicious with a caramel drizzle, but the only salt I could taste was the actual granules sitting on top of the frosting.  I think it would have been better if it had been distributed through the frosting or even the cupcake.  

We carried on our 4th July fun by having some amazing pulled pork at Bodean's...if you haven't been there I urge you to go - it's the best! 

For anyone who still wants the chance to win a gourmet cheesecake of your choice be sure to enter my giveaway, you have just 3 hours left before the winner is picked! 

LinkWithin

Related Posts with Thumbnails